How to Build a DIY Low Tunnel Greenhouse (Caterpillar Tunnel)

By Efraín Vega · Published November 15, 2026
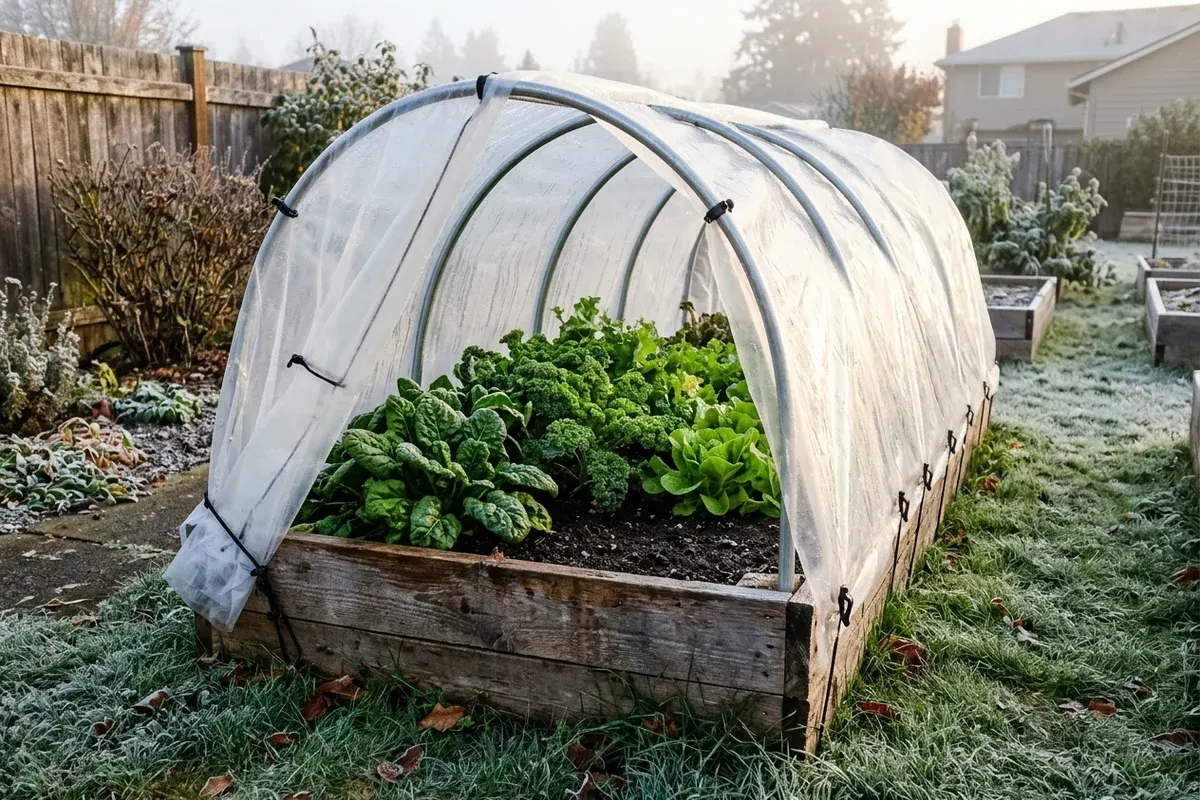
A low tunnel (often called a caterpillar tunnel or hoop house) is the most cost-effective season extension structure in regenerative market gardening. While a full walk-in high tunnel greenhouse costs thousands of dollars, a raised bed low tunnel costs under $50 to $75 to construct and extends your harvest by 6 to 12 weeks on both sides of winter.
By creating a sheltered, wind-free microclimate directly over your garden beds, low tunnels allow you to harvest cold-hardy salad greens throughout the winter and protect delicate spring starts from unseasonal late frosts.
Follow this step-by-step tutorial to build a storm-resistant, snow-bearing 4-foot by 8-foot EMT conduit low tunnel.
Season Extension Comparison: Low Tunnel vs Cold Frame
Both structures provide winter protection, but each serves different garden layouts:
| Feature | DIY Low Tunnel (Hoop House) | DIY Cedar Cold Frame |
|---|---|---|
| Average Cost | $40 – $75 | $120 – $220 |
| Interior Height | 30" to 36" (Accommodates tall kale & brassicas) | 12" to 18" (Best for low leafy greens) |
| Footprint Flexibility | Easily covers entire 8-foot or 12-foot beds | Typically 3x4 ft or 4x4 ft box |
| Material Weight | Lightweight; removable in spring | Heavy timber box; permanent or semi-permanent |
| Venting Method | Slide plastic up along hoop arches | Hinged sash or automatic thermal piston |
| Summer Use | Swap plastic for insect netting or 30% shade cloth | Removable lid or left open |
Low Tunnel Geometry & Hoop Bending
Standard 10-foot sticks of 1/2-inch EMT (Electrical Metallic Tubing) steel conduit are the gold standard for DIY hoop houses. Unlike PVC pipe, which sags in summer heat and shatters in sub-zero freezes, EMT steel holds its shape permanently.
            10-FOOT EMT CONDUIT HOOP PROFILE:

                         Peak Height: 32"–36"
                                 ╭─╮
                              ╭──╯ ╰──╮
                           ╭──╯       ╰──╮
                        ╭──╯             ╰──╮
                     ╭──╯                   ╰──╮
                  ╭──╯                         ╰──╮
     Bed Board ──►█                               █◄── Bed Board
                  │   ◄──── 48" Base Width ────►  │
                  ▼                               ▼
               Mounted inside 1/2" Two-Hole Straps or Pipe Sockets
How to Bend the Conduit:
- The Conduit Bender Method: Use an inexpensive 1/2-inch hand conduit bender. Make three progressive 30-degree bends: one in the center, and one roughly 20 inches to either side.
- The Plywood Jig Method (Easiest): Trace a smooth 48-inch wide semicircle onto a scrap sheet of 3/4-inch plywood. Screw 2x4 scrap blocks along the arc line. Slip one end of the 10-foot EMT stick against the stops and gently bend the pipe around the wood curve until it springs into a uniform arch.
Materials & Hardware List (4' x 8' Raised Bed)
All materials are readily available at any local building supply or hardware store:
        LOW TUNNEL TENSION STRAPPING SCHEMATIC:

             Hoop 1           Hoop 2           Hoop 3
               ∩                ∩                ∩
             ╱ │ ╲            ╱ │ ╲            ╱ │ ╲
            ╱  │  ╲  Zig-zag ╱  │  ╲  Tension ╱  │  ╲
           ╱   │   ╲  Rope  ╱   │   ╲  Cord  ╱   │   ╲
          ○────┴────○──────○────┴────○──────○────┴────○  ◄── Eyebolts
         [████████████████████████████████████████████] ◄── Raised Bed Timber
| Component | Quantity | Specification | Purpose |
|---|---|---|---|
| Metal Hoops | 3 to 4 | 1/2" × 10' EMT Conduit | Rigid arch framework spaced every 3 to 4 feet |
| Hoop Mounting Brackets | 6 to 8 | 1/2" Two-Hole Pipe Straps | Secure hoops to interior timber walls with 1-1/2" screws |
| Greenhouse Film | 1 Sheet | 10' wide × 14' long, 6-mil UV-Clear | Professional thermal greenhouse poly (lasts 4+ years) |
| Tension Strapping | 50 feet | 1/4" braided polyester rope or bungee | Criss-crosses over plastic to lock down against wind |
| Anchor Eyebolts | 8 to 10 | 1/4" × 2" Zinc-plated eye screws | Fastened to raised bed exterior to route tension cord |
| Film Snap Clamps | 8 to 12 | 1/2" Plastic Snap Clamps | Quick-release clips for securing plastic during venting |
| End Anchor Weights | 2 | Smooth stones, sandbags, or wood batten | Weight down excess plastic at the tunnel ends |
Need to build the wooden raised bed first? Calculate boards and cut dimensions with our Raised Bed Lumber Calculator.
Step-by-Step Construction Guide
Step 1: Mount the Pipe Brackets
- On the inside walls of your wooden raised bed, measure hoop locations: place one hoop 6 inches from each end, and space intermediate hoops every 36 to 48 inches.
- Screw two 1/2-inch metal two-hole pipe straps vertically along each marked location using 1-1/4" ceramic exterior wood screws.
- Slide the ends of your bent EMT hoops straight down through the straps until they rest securely against the bed subsoil.
Step 2: Install Exterior Anchor Eyebolts
- On the outside face of the raised bed timbers, screw 1/4-inch eyebolts into the wood.
- Position one eyebolt directly beneath each hoop, plus one intermediate eyebolt halfway between each hoop.
- Screw two eyebolts into the short ends of the bed to anchor the gathered plastic ends.
Step 3: Drape and Secure the Greenhouse Film
- Pull your 10' × 14' sheet of 6-mil greenhouse film over the hoops. Center the film so you have roughly 12 to 18 inches of excess draped along both sides and 2 to 3 feet of excess at the ends.
- Fasten the plastic to the hoop apexes and side knees using 1/2-inch snap clamps.
- Gather the excess plastic at each end of the tunnel into a ponytail, twist tightly, tie with utility cord, and stake it into the ground or anchor it with a 25-lb sandbag.
Step 4: String the Wind-Tension Cord
- Tie your polyester rope or bungee cord to the first eyebolt on one corner of the bed.
- Route the rope up over the plastic, angling diagonally across to the second eyebolt on the opposite side of the bed.
- Zig-zag back and forth between every hoop until the entire tunnel is criss-crossed with tight tension lines. This holds the plastic snugly against the steel arches, preventing wind buffeting and shedding rain and snow cleanly.
Microclimate & Temperature Management
A low tunnel functions as an active solar trap. Overheating kills more winter crops than sub-freezing cold.
               LOW TUNNEL DAILY VENTILATION CYCLE:

         NIGHT (Freezing 20°F)            MIDDAY SUN (38°F Outside)
        ┌─────────────────────┐          ┌─────────────────────┐
        │ Plastic sealed tight│          │ Plastic raised 18"  │
        │ to soil level.      │          │ on leeward side to  │
        │ Traps ground heat.  │          │ prevent heat scorch.│
        └─────────────────────┘          └─────────────────────┘
- Sunny Winter Days (35°F–50°F / 2°C–10°C): Solar radiation entering the tunnel can push internal air to 90°F (32°C). Simply slide the plastic up 12 to 18 inches along the hoops. The snap clamps hold the bunched plastic open for ventilation.
- Double-Layering for Hard Blizzards: When temperatures drop below 15°F (-9°C), drape a layer of medium-weight floating row cover (Agribon AG-30) directly over the crops inside the tunnel underneath the outer plastic film. The still-air void between the two layers adds an extra 6°F to 8°F of frost insulation. Check upcoming freeze windows with our First and Last Frost Date Guide.
- Snow Shedding: The curved EMT hoop profile naturally sheds dry snow. After heavy, wet, sticky snowfall exceeding 6 inches, gently sweep the accumulation off the plastic with a soft broom to prevent excessive downward weight.
Best Winter Vegetables for Low Tunnel Production
Cool-season crops have natural antifreeze sugars that allow them to endure winter freezes inside a low tunnel:
- Spinach (Spinach Profile): The king of the winter garden. Survives 0°F (-18°C) under double cover; leaves become thick, crisp, and exceptionally sweet.
- Winter Lettuce (Lettuce Profile): Cold-hardy butterheads (e.g., 'Winter Density', 'Marvel of Four Seasons') produce continuous cut-and-come-again salads.
- Kale & Brussels Sprouts (Kale, Brussels Sprouts): Dwarf varieties hold all winter long without windburn.
- Turnips & Radishes (Turnip, Radish): Early spring and late autumn crops mature 3 weeks faster under hoop plastic.
- Parsnips (Parsnip Profile): Keeps surface soil unfrozen so sweet winter parsnips can be dug without a pickaxe.
Related Guides & Calculators
- How to Build a DIY Cedar Cold Frame — Heavy-duty passive solar timber cold frame plans.
- How to Protect Plants from Frost — Frost cloths, cloches, and emergency winter defenses.
- Raised Bed Lumber Calculator — Sizing timber beds for hoop house foundations.
- How to Prepare Raised Beds for Winter — Soil nourishment, mulching, and bed winterization.
- First & Last Frost Dates by City — Planting schedules and seasonal freeze protection.
FAQ
How much frost protection does a low tunnel greenhouse provide?
A single layer of 6-mil greenhouse plastic over a low tunnel provides 4°F to 8°F (2°C–4°C) of frost protection. Combining 6-mil plastic with an inner floating row cover (Agribon AG-30 or AG-50) creates a microclimate buffer of 12°F to 15°F (7°C–8°C), enabling gardeners to harvest winter spinach, mache, and kale through sub-zero blizzards.
Is EMT conduit better than PVC pipe for hoop house arches?
Yes. 1/2-inch EMT (electrical metallic tubing) steel conduit is vastly superior to PVC. EMT conduit does not degrade under UV sunlight, will not snap in freezing sub-zero winds, and easily bears heavy wet snow loads that would pancake flexible PVC pipes. A 10-foot stick of EMT costs roughly $5 to $7 at hardware stores.
How wide and tall is a 10-foot EMT conduit hoop when bent?
When a standard 10-foot stick of 1/2-inch EMT is bent with a pipe bender or homemade wooden bending jig, it creates an arch approximately 4 feet wide at the base and 30 to 36 inches tall at the center peak. This spans a standard 4x8 ft raised bed with ample headroom for mature crops.
How do you vent a low tunnel on sunny winter days?
On bright sunny winter days, internal temperatures can quickly surge above 85°F (29°C) even when outside temperatures hover near freezing. To vent, push the plastic up along the leeward (downwind) side of the hoops, holding it in place with snap clamps or tension ropes. Lower and secure the plastic 2 hours before sunset to trap evening ground heat.
How do you secure a low tunnel against high winds?
The most wind-resistant method is the zig-zag bungee or marine rope system. Install screw eyes or heavy hooks on both sides of the raised bed between every hoop. Criss-cross high-tensile polyester cord over the plastic from hoop to hoop, cinching the film tightly against the metal frame like a drumhead.