How to Build a DIY Cedar Trash Can Enclosure (Dual 96-Gallon Bins)

By Efraín Vega · Published November 15, 2026
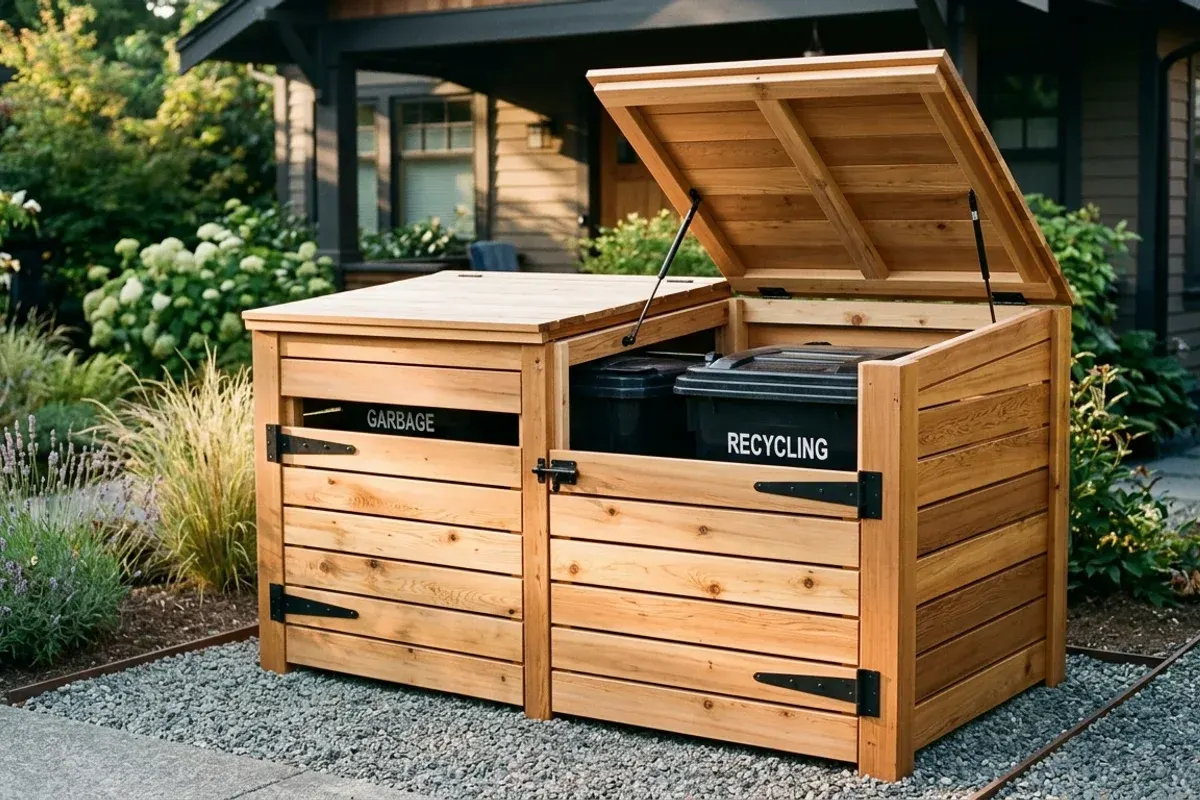
Municipal roll-out wheelie bins are an essential utility of modern living, but their bulky plastic construction and bright green or blue lids can easily ruin a home's curb appeal and landscape aesthetic. Tucking them on the side of the garage often leads to foul odors, blown-over cans during thunderstorms, and midnight raids by curious raccoons.
This DIY woodworking plan walks through building a freestanding Western red cedar dual trash and recycling enclosure. Designed with horizontal ventilated louvers, front-opening doors for garbage day roll-out, and a top-hinged lid balanced with pneumatic gas struts, this structure keeps bins accessible, ventilated, and completely hidden from view.
┌────────────────────────────────────────────────────────┐
│             DUAL 96-GALLON ENCLOSURE ELEVATION         │
├────────────────────────────────────────────────────────┤
│                     70" Exterior Width                 │
│   ┌────────────────────────────────────────────────┐   │
│   │ [Top Lift Lid with Gas Struts] (Rain Shedding) │   │
│   ├───────────────────────┬────────────────────────┤   │
│   │                       │                        │ ▲ │
│   │   Left Door           │   Right Door           │ │ │
│   │   [Trash 96-Gal]      │   [Recycle 96-Gal]     │ 52"│
│   │                       │                        │ │ │
│   │   Horizontal Cedar    │   Horizontal Cedar     │ │ │
│   │   Slats (1/4" Air Gap)│   Slats (1/4" Air Gap) │ ▼ │
│   └───────────────────────┴────────────────────────┘   │
│   ══════════════════════════════════════════════════   │
│   ◄─── 4" Compacted Crushed Gravel Base / Pavers ───►  │
└────────────────────────────────────────────────────────┘
Dimensioning & Bin Clearances
Never build a trash enclosure without verifying your local waste management cart sizes. The dimensions below are engineered for two standard 96-gallon carts, the largest standard residential size in North America:
| Dimension Strata | Single 96-Gal Cart | Required Double Enclosure Interior | Final Exterior Frame Size |
|---|---|---|---|
| Width | 29.5" | 64" – 66" (Allows 3" between bins) | 70" Outer Width |
| Depth | 35.5" (front to handle) | 38" – 40" (Clear door clearance) | 42" Outer Depth |
| Height | 43.5" (ground to lid) | 48" – 50" (Allows cart lid to open) | 52" Front / 54" Rear (2" Roof Pitch) |
Materials & Hardware Cut List
Western red cedar is the premier wood choice for outdoor utility enclosures due to its natural resistance to decay, insect boring, and dimensional warping. Pressure-treated pine is utilized for the ground-contact base framing.
Framing Lumber (Pressure-Treated or Cedar)
- Base Frame Skids: 2x4 PT Pine: 2 @ 70" (Front/Back), 3 @ 39" (Sides & Center joist)
- Vertical Corner Posts: 2x4 Cedar or PT Pine: 2 @ 52" (Front Posts), 2 @ 54" (Rear Posts for roof slope), 2 @ 52" (Center Door Jambs)
- Top Header Rails: 2x4 Cedar: 2 @ 70" (Front/Back Headers), 2 @ 39" (Side Rafters)
Siding & Slats (Western Red Cedar)
- 1x4 or 1x6 S4S Cedar Slats (Nominal 3/4" thick):
- Side Walls (Left & Right): 26 boards @ 42"
- Rear Wall: 13 boards @ 70"
- Front Doors (Two doors): 26 boards @ 33-1/2"
- Top Lid Rafters & Cladding: 2x2 framework clad in 1x6 tongue-and-groove or overlapped cedar slats (38" x 70")
Hardware & Fasteners
- Hinges: 4 heavy-duty 8" matte black exterior strap hinges (for front doors)
- Lid Hinges: 3 heavy-duty 4" exterior utility butt hinges or continuous piano hinge
- Gas Struts: Two 100N to 120N 15-inch pneumatic gas shock lift supports
- Latches: 2 heavy-duty spring-loaded barrel bolts and 1 padlock hasp
- Fasteners: #8 x 1-5/8" stainless steel screws (slat fastening); #9 x 3" exterior coated framing screws (frame joinery)
- Lid-to-Bin Linkage: 2 stainless steel eye hooks, 2 carabiner clips, and 4 feet of nylon-coated wire cable
Foundation Preparation: The Gravel Pad
Wheelie bins weigh upwards of 150 lbs when filled with yard waste or glass recyclables. Rolling heavy wheels over soft soil or mud will quickly rut the ground and cause the wooden enclosure to sag out of square.
┌────────────────────────────────────────────────────────┐
│             GRAVEL ENCLOSURE PAD CROSS-SECTION         │
├────────────────────────────────────────────────────────┤
│  Enclosure 2x4 PT Base Skids                           │
│  ┌──────────────────────────────────────────────────┐  │
│  │ 2" Leveling Pavers / Rubber Mats Under Wheels    │  │
│  ├──────────────────────────────────────────────────┤  │
│  │ 4" Compacted #57 Crushed Limestone Gravel        │  │
│  ├- - - - - - - - - - - - - - - - - - - - - - - - - ┤  │
│  │ Woven Heavy-Duty Geotextile Weed Barrier Fabric  │  │
│  └══════════════════════════════════════════════════┘  │
│    Native Compacted Subsoil Grade                      │
└────────────────────────────────────────────────────────┘
- Excavation: Dig a rectangular footprint 78" wide by 48" deep (allowing a 4-inch gravel apron around the enclosure) to a depth of 4 to 5 inches.
- Weed Membrane: Lay heavy-duty woven landscape fabric across the subgrade to prevent gravel from sinking into native mud.
- Crushed Stone Base: Fill with 4 inches of angular #57 crushed limestone gravel or 3/4" crushed bluestone. Compact thoroughly with a hand tamper. Calculate exact material volumes using our Gravel Calculator or Shed Foundation Calculator.
- Door Threshold Ramp: Keep the front lip of the gravel pad flush with the adjacent turf or driveway pavers so rolling carts glide smoothly without catching on a tall curb.
Step-by-Step Framing & Assembly Guide
Step 1: Base & Upright Post Skeleton
- Assemble the 70" x 42" bottom perimeter frame using pressure-treated 2x4 lumber. Fasten corner joints with two 3" exterior framing screws per joint. Verify squareness by measuring diagonal corner-to-corner distances (they must match within 1/8").
- Fasten the four corner posts to the inside of the base frame. Note that the rear posts are 54" tall and front posts are 52" tall, establishing a 2-inch forward slope so rainwater drains naturally off the lid.
- Plumb the posts with a 4-foot spirit level and install the top 2x4 headers and side rafters.
         EXPLODED 3D WIREFRAME OF STRUCTURAL SKELETON
                  ┌──────────────────────┐  <- 54" Rear Header
                 /│                     /│
                / │                    / │
  52" Front    ┌──┼───────────────────┐  │
  Header ----> │  │                   │  │
               │  │                   │  │
               │  └───────────────────┼──┘
               │ /                    │ /
               └──────────────────────┘
                  Base Frame 70" x 42"
Step 2: Siding Installation with Ventilation Spacers
Trash cans require continuous airflow to dissipate methane, moisture, and odors. Trapping heat inside an airtight box accelerates bacterial rot:
- Use 1/4-inch plywood scraps or tile spacers between each horizontal cedar board.
- Fasten the 1x4 or 1x6 cedar slats to the outside of the framing, starting from the bottom base and working upward.
- Pre-drill and drive two #8 x 1-5/8" stainless steel screws through each board into the framing posts.
Step 3: Fabricating Front Access Doors
The front doors must swing open a full 180 degrees so carts roll straight out to the curb on collection morning:
- Build two identical door frames from 2x4 cedar, each measuring 33-1/2" wide by 47" tall (leaving a 1/2" clearance gap between doors and 1/2" clearance above the ground threshold).
- Install a diagonal 2x4 brace running from the bottom hinge corner to the top latch corner to prevent door sag over time.
- Clad the exterior face of each door with horizontal cedar slats matching the side wall spacing.
- Mount each door using two 8-inch heavy-duty black powder-coated strap hinges lagged directly into the corner posts.
Installing the Gas Strut Roof & Auto-Lid Coupler
The top lid provides daily access for tossing kitchen trash bags without opening the large front doors:
┌────────────────────────────────────────────────────────┐
│         THE GAS STRUT & BIN COUPLER MECHANISM          │
├────────────────────────────────────────────────────────┤
│                      Top Lift Lid                      │
│      ┌──────────────────────────────────────────┐      │
│      │  (Eye Hook)                              │      │
│      │     \                                    │      │
│      │      \ Cable Link                        │      │
│      │       \                                  │      │
│      │     [Plastic Cart Lid]                   │      │
│      │      (Pivots Open Simultaneously!)       │      │
│      │                                          │      │
│      │   \                                      │      │
│      │    \ Gas Strut (120N Lift Force)         │      │
│      │     \ (Propped securely at 70°)          │      │
│      └──────\───────────────────────────────────┘      │
│              Post Frame                                │
└────────────────────────────────────────────────────────┘
- Lid Framing: Construct a rigid lid frame measuring 71" wide by 43" deep from 2x2 cedar stock, clad in solid tongue-and-groove or overlapping cedar boards.
- Mounting Hinges: Anchor the rear of the lid to the top rear header using three heavy-duty exterior butt hinges.
- Pneumatic Gas Struts: Install one 100N or 120N gas strut on each side jamb:
- Mount the lower cylinder ball stud to the interior side post, approximately 18 inches down from the top header.
- Mount the upper piston rod ball stud to the underside of the lid frame, 12 inches forward of the rear hinge line.
- The gas pressure gently lifts the roof when unlatched and holds it steady in high winds.
- The Automatic Trash Can Lid Coupler:
- Screw an exterior stainless steel eye hook into the underside of the wooden lid directly above each cart.
- Attach a 24-inch coated steel cable with a spring snap carabiner.
- Clip the carabiner to the handle of the plastic roll-away cart lid.
- Now, whenever you lift the cedar lid, the plastic trash can opens automatically underneath!
Protective Finishes & Maintenance
Western red cedar naturally weathers to a rustic silver-gray patina over 2 to 3 years if left untreated. However, because trash enclosures endure grease, organic residue, and high humidity, applying protection extends its service life:
- Penetrating Oil Stain: Apply two coats of exterior semi-transparent oil stain (such as Messmer's UV Plus or Armstrong Clark) to preserve the rich cedar tones and repel rain.
- Interior Odor Neutralization: Mount an outdoor activated charcoal filter pad or cedar sachet to the inside lid framework to absorb volatile odors during hot summer afternoons.
- Power Washing Care: Rinse the gravel floor once or twice per season with a garden hose and mild biodegradable soap to wash away any liquid leakage.
Frequently Asked Questions
Can this design be expanded to hold three 96-gallon bins?
Yes! To house three full-sized bins (trash, recycling, and organic yard waste), extend the overall exterior width to 102 inches. Add a third intermediate 2x4 vertical post and split the front into three individual doors or two wider double doors with a center latch post.
How do I prevent strong winds from ripping the lid open?
Always install a front security latch or hasp with a carabiner lock on the center front of the lift lid. While gas struts provide upward lift assist, a mechanical latch ensures the roof remains tightly sealed during severe windstorms.
Can I build this enclosure on a slight slope?
Yes, but the floor threshold where bins roll out must be level. Level your gravel foundation pad by excavating the high side and installing a treated 4x4 or 6x6 timber retaining curb on the downhill side.
FAQ
What are the interior dimensions needed to store two 96-gallon roll-away trash cans?
Standard municipal 96-gallon roll-out carts measure approximately 35.5 inches deep, 29.5 inches wide, and 43.5 inches tall. To accommodate two carts comfortably with rolling clearance and lid swing, the interior enclosure requires at least 65 inches of clear width, 38 inches of interior depth, and 48 inches of vertical height.
Does a trash can enclosure require a concrete slab foundation?
No. A concrete pad is ideal, but an excavation with 4 inches of compacted #57 crushed limestone gravel contained by a pressure-treated 4x4 timber border provides a rock-solid, permeable base for a fraction of the cost. The gravel allows liquid spills to drain naturally without pooling.
How do gas struts assist the heavy cedar lift lid?
A framed wooden lid clad in cedar weighs between 30 and 45 lbs. Installing two 100N (22 lb-force) to 120N (27 lb-force) pneumatic gas lift struts allows you to lift the roof effortlessly with one finger, keeping it propped open at 70 degrees while tossing waste bags.
How do you link the wooden lid to the plastic wheelie bin lid?
Attach a small stainless steel eye hook to the underside of the wooden lift lid, directly above the center of each trash can. Fasten a coated cable or stainless steel chain from this hook to a small handle clip on the plastic cart lid. Lifting the wooden enclosure roof automatically lifts the trash can lid simultaneously for hands-free disposal.
How do you keep raccoons and pests out of a wooden trash enclosure?
Use heavy-duty spring-loaded latches or locking hasps on both the top lid and front swinging doors. Raccoons have dexterous paws capable of opening simple slide bolts; carabiners or padlocks prevent nocturnal wildlife from accessing bins.