How to Build a DIY Cedar Walkthrough Garden Arbor

By Efraín Vega · Published November 16, 2026
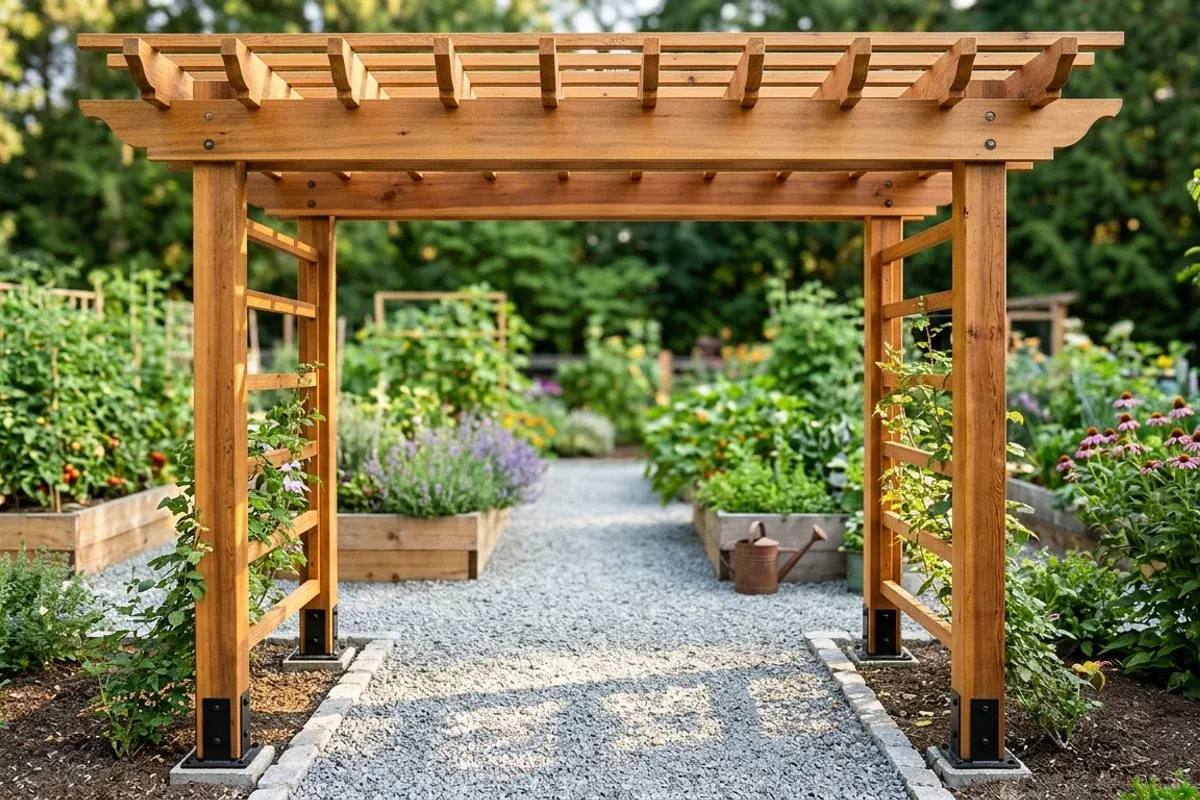
A walkthrough garden arbor is the crowning architectural feature of any backyard landscape. Placed at the entrance of a raised bed garden, over a gravel walkway, or between distinct garden "rooms," a well-proportioned arbor provides an irresistible visual focal point while creating vertical growing space for climbing roses, clematis, or edible vines.
Commercial store-bought arbor kits sold at big-box home improvement centers are notorious for using flimsy 1-inch stapled pine or thin tubular steel that rusts and buckles under the weight of mature climbing foliage.
Building your own custom arbor from Western red cedar with half-lap rafter joinery and heavy-duty structural post bases yields an heirloom garden structure capable of enduring high winds, heavy snow loads, and decades of weathering.
Use our Arbor & Trellis Lumber Calculator to customize lumber requirements for non-standard dimensions.
Arbor Structural Anatomy & Dimensional Standards
Before purchasing lumber, review the key structural components and critical clearances:
┌─────────────────────────────────────────────────────────────────┐
│               DIY CEDAR GARDEN ARBOR FRONT ELEVATION            │
├─────────────────────────────────────────────────────────────────┤
│                     60" Cantilevered 2x6 Beam                   │
│   ◄─── 6" ───►┌─────────────────────────────────┐◄─── 6" ───►   │
│   ┌───────────┘ [2x6 Header with 45° Tail Cuts] └───────────┐   │
│   │  [Interlocking 2x4 Top Rafters with Half-Lap Notches]   │   │
│   └──┬───────────────────────────────────────────────────┬──┘   │
│      │ 3/8" Carriage Bolts                               │      │
│      │                                                   │      │
│   ┌──┴──┐                                             ┌──┴──┐   │
│   │ 4x4 │  ◄──────── 48" Clear Walkway Width ───────► │ 4x4 │ ▲ │
│   │Post │                                             │Post │ │ │
│   │     │  ═════════════════════════════════════════  │     │ │ │
│   │     │  Side Climbing Ladder Rungs (2x2 Cedar)     │     │84"│
│   │     │  ═════════════════════════════════════════  │     │ │ │
│   │     │                                             │     │ │ │
│   │     │  ═════════════════════════════════════════  │     │ ▼ │
│   └──┬──┘                                             └──┬──┘   │
│      │                                                   │      │
│   [Standoff Post Base - 1" Gap Above Concrete Grade]     │      │
│   ═════════════════════════════════════════════════════════════ │
│   ◄──────── Crushed Stone Walkway / Garden Grade ─────────────► │
└─────────────────────────────────────────────────────────────────┘
Critical Dimensions for Comfort & Function:
- Clear Passage Width (48 inches): Accommodates standard 32-inch wheelbarrows, garden carts, and broad harvest baskets with generous elbow room.
- Clear Overhead Height (84 inches / 7 feet): Ensures tall family members and guests walk through upright without ducking—even after heavy climbing rose canes or grape clusters drape downward by 6 to 10 inches.
- Structure Depth (36 to 48 inches): Provides sufficient side ladder width for climbing plants to establish a deep, lush botanical archway without crowding the pathway.
Materials & Lumber Cut List
Western red cedar is graded primarily into Clear Heart (knot-free, architectural grade) and Architectural Knotty / STK (Select Tight Knot). For outdoor arbors, Select Tight Knot (S4S) provides superior strength and classic rustic character at half the cost of clear vertical grain.
Lumber Schedule (Standard 4' Wide × 3' Deep × 7' High Arbor)
| Component | Quantity | Nominal Size | Finished Length | Material Specification |
|---|---|---|---|---|
| Corner Posts | 4 | 4x4 | 96" (8 ft) | Western Red Cedar S4S |
| Main Header Beams | 4 | 2x6 | 60" (5 ft) | Western Red Cedar S4S (Dual beam pairs) |
| Cross Rafters | 5 | 2x4 | 48" (4 ft) | Western Red Cedar S4S with decorative tails |
| Top Purlins / Lattice | 6 | 2x2 | 60" (5 ft) | Western Red Cedar S4S |
| Side Ladder Rungs | 16 | 2x2 | 33" | Western Red Cedar S4S (8 per side, spaced 8" OC) |
| Concrete Footing Forms | 4 | 8" dia. | 36"–48" | Sonotube Cardboard Footing Tubes |
Hardware & Fasteners
- Post Bases: 4 × Simpson Strong-Tie ABU44Z (or CBSQ44 hot-dipped galvanized standoff bases).
- Beam Mounting Bolts: 8 × 3/8" × 7" hot-dipped galvanized or 316 stainless steel carriage bolts with washers and nylon-locking locknuts.
- Structural Framing Screws: 2 lbs of #10 × 3" ceramic-coated exterior star-drive wood screws (Simpson Strong-Tie SDS or GRK Fasteners).
- Rung & Purlin Screws: 1 lb of #8 × 2-1/2" trim-head exterior stainless steel screws.
- Concrete: 8 to 12 bags (50 lb) fast-setting exterior concrete mix (calculate exact volume with our Concrete Footing Calculator).
- Wood Glue: Exterior Type III waterproof wood glue (Titebond III).
Step 1: Pre-Fabricating Decorative Beam & Rafter Tails
Cutting clean, consistent architectural tails elevates a rustic backyard arbor into an architectural showcase. Pre-fabricate all beam ends on sawhorses before raising the structure.
┌─────────────────────────────────────────────────────────┐
│               CLASSIC 45° CORBEL TAIL TEMPLATE          │
├─────────────────────────────────────────────────────────┤
│   Top Edge of 2x6 Header                                │
│   ─────────────────────────────────────────────┐        │
│                                                │        │
│                                           45°  │        │
│                                        ◄────── │ 2"     │
│                                       /        │ Drop   │
│                                      /         └────┐   │
│                                     /               │   │
│                                    /                │3.5"│
│                                   /                 │   │
│   ───────────────────────────────┴──────────────────┘   │
│   Bottom Edge of 2x6 Header                            │
└─────────────────────────────────────────────────────────┘
- Make a Reusable Cardboard Template:
- Measure 4 inches in from the bottom corner of a 2x6 board.
- Measure 2 inches down from the top edge at the end.
- Connect these points with a crisp 45-degree angled line, or draw a sweeping 3-inch radius curve using a compass or paint can rim.
- Cut with a Jigsaw or Bandsaw:
- Trace the profile onto both ends of all four 2x6 header beams and all five 2x4 cross rafters.
- Cut slowly along the pencil line with a fine-toothed clean-cut wood jigsaw blade.
- Gang-Sand for Uniformity:
- Clamp the matching boards together face-to-face on your workbench.
- Run a belt sander or random orbital sander (80-grit followed by 120-grit) across the clamped ends so every tail profile is identical to within 1/32 of an inch.
Step 2: Cutting Interlocking Half-Lap Rafter Notches
Standard arbors that simply screw rafters flat across the top of header beams are vulnerable to wind racking. Cutting half-lap notches interlocks the 2x4 rafters directly into the 2x6 beams, locking the roof grid square permanently.
- Mark Rafter Spacing:
- The five 2x4 rafters will span across the top of the arbor at 12-inch centers.
- On the top edge of each 2x6 beam, mark pairs of lines 1-1/2 inches apart (the actual thickness of a 2x4) at:
- 6" from end (Outer overhang rafter)
- 18"
- 30" (Exact center rafter)
- 42"
- 54" (Opposite outer overhang rafter)
- Depth of Cut (1-1/2 inches):
- Set the depth gauge on your circular saw to exactly 1-1/2 inches.
- Make closely spaced kerf cuts (1/8-inch apart) across each marked notch area between your pencil lines.
- Clean with a Chisel:
- Tap out the wooden wafers with a sharp 1-inch wood chisel.
- Pair the flat bottom of the notch clean so your 2x4 cross rafters drop in snug with a gentle friction fit.
Step 3: Footing Layout & Post Anchoring
Frost heave can tilt an arbor out of plumb within two winters if posts are shallow. Pouring dedicated concrete piers ensures permanent stability.
┌─────────────────────────────────────────────────────────┐
│               CONCRETE FOOTING & STANDOFF BASE          │
├─────────────────────────────────────────────────────────┤
│   4x4 Cedar Post                                        │
│   │                                                 │   │
│   │  [Structural Ceramic Hex-Head Screws]           │   │
│   └──┬───────────────────────────────────────────┬──┘   │
│      │   Simpson ABU44Z Standoff Base Plate      │      │
│   ═══╧═══════════════════════════════════════════╧═══   │
│   ▲  1" Air Gap (Prevents End-Grain Capillary Rot)      │
│   ▼  Crowned Concrete Pier (Slopes Water Away)          │
│   ┌─────────────────────────────────────────────────┐   │
│   │ 8" Sonotube Concrete Pier                       │   │
│   │ (Extends 36"–48" Below Local Frost Line)        │   │
│   │                                                 │   │
│   │ ◄── Compacted 3/4" Crushed Stone Drainage Bed ─►│   │
│   └─────────────────────────────────────────────────┘   │
└─────────────────────────────────────────────────────────┘
- Stake the Footing Footprint:
- Layout four stakes marking the post centerlines: 48 inches wide by 36 inches deep.
- Measure diagonal distances from opposite corner stakes using the 3-4-5 Pythagorean theorem. Adjust corner positions until both diagonal measurements match exactly (for 48" × 36", diagonals must measure exactly 60 inches / 5 feet).
- Excavate Below Frost Line:
- Dig four 8-inch diameter holes using a power auger or two-person post hole digger. Depth should be 6 inches below your regional frost line (typically 36"–42" in northern USDA zones 4–6; 24" in southern zones 7–9).
- Tamp 4 inches of 3/4-inch crushed gravel at the base of each hole for sub-surface drainage.
- Pour Piers with Standoff Brackets:
- Insert cardboard Sonotube sleeves extending 3 inches above the finished garden grade.
- Fill with concrete mix, rodding to eliminate air voids. Crown the top concrete surface outward so rainwater sheds away from the post base.
- Insert 1/2-inch J-bolt anchors into the wet concrete, or allow concrete to cure 48 hours and drill 1/2-inch wedge anchors to fasten the Simpson Strong-Tie ABU44 post shoes.
Step 4: Assembling the Side Climbing Ladders
Assembling each two-post side ladder flat on sawhorses is vastly easier and more accurate than fastening rungs while standing on a step ladder.
- Lay Out Post Pairs:
- Place two 8-foot 4x4 posts parallel on sawhorses, spaced 33 inches apart to yield a 40-inch outer post footprint.
- Square the assembly using diagonal tape checks.
- Mark Rung Positions:
- Starting 18 inches above the bottom post base (above ground splash zone), mark 8 horizontal lines spaced 8 inches on center up the post faces to a height of 74 inches.
- Fasten 2x2 Cedar Rungs:
- Apply a bead of Titebond III exterior waterproof wood glue to each rung end.
- Pre-drill counter-bored pilot holes to prevent splitting the cedar end-grain.
- Fasten each 2x2 rung to the inside post face using two #10 × 3-inch ceramic-coated exterior wood screws per side.
- Repeat for Side 2:
- Verify both side ladders have identical rung spacing so your cross-connections match perfectly.
Step 5: Raising Posts & Mounting Header Beams
With both side ladders built, erect the framework onto the concrete piers:
- Mount Side Ladders into Post Shoes:
- Lift the first side ladder into the two metal post base shoes.
- Fasten through the bracket holes into the 4x4 cedar post using hot-dipped galvanized 1/4" × 2" hex drive wood screws.
- Temporarily brace the ladder plumb in both directions using diagonal 1x4 stakes staked into the turf.
- Raise the second side ladder and brace similarly.
- Verify Level Across Both Sides:
- Rest an 8-foot level (or a straight 2x4 with a 4-foot level on top) across the top ends of opposite posts.
- If posts are slightly uneven due to minor footing variations, scribe and trim the high post flush with a handsaw.
- Clamp and Through-Bolt the 2x6 Header Beams:
- The arbor uses sandwich beams (one 2x6 on the inside of the posts, one 2x6 on the outside of the posts) on both the front and rear faces.
- Clamp the beams in position with 6-inch overhangs on each flank.
- Drill two 3/8-inch clearance holes through both 2x6 beams and the center 4x4 post at each connection.
- Drive 3/8" × 7" galvanized carriage bolts from the outside face, tapping the square neck into the wood, and tighten washers and nylon locknuts on the inside.
Step 6: Setting Rafters & Top Shade Purlins
- Drop Interlocking 2x4 Rafters into Place:
- Place your five notched 2x4 rafters across the header beams.
- Tap each rafter down into its mating 1-1/2" notch with a rubber mallet.
- Secure each rafter intersection by driving a #10 × 3-inch ceramic screw diagonally (toenail style) through the rafter into the beam.
- Install Top 2x2 Purlins:
- Space six 60-inch 2x2 cedar purlins evenly across the top of the 2x4 rafters (perpendicular to the rafters).
- Fasten each purlin intersection with a single #8 × 2-1/2" trim-head exterior screw. These purlins provide rigid lateral resistance and create charming dappled sunlight below.
Step-by-Step Construction Timeline
┌────────────────────────────────────────────────────────┐
│               WEEKEND BUILD TIMELINE & WORKFLOW        │
├────────────────────────────────────────────────────────┤
│ DAY 1: MORNING                                         │
│ • Layout 48" x 36" footing perimeter & check diagonals │
│ • Auger 8" post holes below frost line (36"-42")       │
│ • Pour concrete piers with Simpson ABU44 standoff bases│
│                                                        │
│ DAY 1: AFTERNOON (While concrete cures)                │
│ • Cut decorative 45° corbel tails on 2x6 and 2x4 stock │
│ • Gang-sand all tail profiles with 120-grit orbital    │
│ • Cut half-lap interlocking rafter notches             │
│ • Pre-assemble two side climbing ladders on sawhorses  │
│                                                        │
│ DAY 2: MORNING                                         │
│ • Erect & plumb side ladders into cured post bases     │
│ • Clamp & carriage-bolt dual 2x6 main header beams     │
│ • Lock notched 2x4 cross rafters into header grid      │
│ • Fasten top 2x2 shade purlins                         │
│                                                        │
│ DAY 2: AFTERNOON                                       │
│ • Final 150-grit spot sanding                          │
│ • Apply penetrating exterior semi-transparent oil stain│
│ • Lay crushed stone walkway bed through arbor passage  │
└────────────────────────────────────────────────────────┘
Best Climbing Vines for a Cedar Garden Arbor
A bare wooden arbor is only half-finished. Selecting the right climbing plants transforms the structure into a living garden tunnel without compromising structural integrity:
| Plant Variety | Growth Mechanism | Annual Weight Load | Pruning & Care Requirements |
|---|---|---|---|
| Climbing Roses (e.g., 'New Dawn', 'Eden') | Long canes tied to rungs (non-clinging) | Moderate | Tie canes horizontally to side rungs to stimulate lateral flowering spurs. Prune dead wood each spring. |
| Clematis (Clematis viticella / Jackmanii) | Twining leaf petiole stems | Light to Moderate | Perfect for 2x2 ladder rungs. Feeds on morning sun while keeping root crown shaded by perennial mulch. |
| Hardy Kiwi (Actinidia arguta) | Twining woody vines | Moderate to Heavy | Self-fertile or male/female pairs produce delicious smooth-skinned edible kiwi berries in late summer. |
| Scarlet Runner Beans | Annual herbaceous twining vines | Very Light | Fast-growing annual producing brilliant red blossoms that attract hummingbirds followed by tender edible bean pods. |
| Table Grapes (e.g., 'Concord', 'Reliance') | Tendril climbers | Heavy | Train two central vertical cordons up posts and prune annually back to two-bud fruiting spurs along top rafters. |
[!WARNING] Avoid Invasive Woody Lianas: Never plant Chinese or Japanese Wisteria (Wisteria sinensis) or Trumpet Vine (Campsis radicans) on a timber arbor. Within 5 to 7 years, mature wisteria trunks develop trunk diameters exceeding 4 inches, generating thousands of foot-pounds of radial torque that can twist 4x4 posts off their footings and crush rafter beams.
Finishing & Long-Term Maintenance
Western red cedar is prized for its longevity, but unsealed cedar exposed to outdoor ultraviolet radiation degrades lignin within 18 months, turning the wood a dull weathered gray.
- Avoid Film-Forming Finishes: Never apply exterior varnishes, polyurethanes, or solid latex paints to an arbor. When humidity fluctuates, wood expands and contracts; film finishes crack, allowing water underneath which blisters the finish and accelerates rot.
- Apply Penetrating Oil-Based Stain: Use high-solids exterior penetrating wood oils containing trans-oxide pigments (such as Ready Seal, TWP 100 Series, or Messmer's UV Plus). These oils penetrate deep into cedar fibers, replenishing natural wood oils, repelling water, and blocking UV fading without peeling.
- Re-Coat Interval: Inspect the top horizontal rafters every 2 to 3 years. When water stops beading on top surfaces, clean with an oxygen bleach wood cleaner and apply a fresh single maintenance coat with a brush or garden pump sprayer.
Related Planning Resources & Calculators
- Arbor & Trellis Lumber Calculator: Custom lumber lists and slat counts for any arbor dimensions.
- Concrete Footing Calculator: Calculate exact bags of concrete needed for 8-inch cylindrical Sonotube piers.
- How to Build a Freestanding Cedar Privacy Screen: Companion cedar woodworking plans for wind-screened patios.
- How to Build a Gravel Walkway: Design the crushed stone pathway leading through your new garden arbor.
- Cattle Panel Trellis Arch Dimensions: Quick heavy-duty steel wire archways for high-yield climbing squash and melons.
FAQ
What is the standard width and height for a garden arbor walkthrough?
A comfortable walkthrough garden arbor requires a minimum clear passage width of 42 to 48 inches (wide enough to navigate easily while carrying a wheelbarrow, harvest crate, or lawn mower) and an overhead clearance of 80 to 84 inches (6 feet 8 inches to 7 feet) from finished grade to the bottom edge of the crossbeams.
Should arbor posts be set in concrete or attached to post base brackets?
While Western red cedar naturally resists rot, setting wooden posts directly encased in concrete accelerates rot at the grade line where moisture collects. The best practice is pouring cylindrical concrete footings (at or below your local frost line) with cast-in-place or wedge-anchored standoff post bases (such as Simpson Strong-Tie ABU44 or CBSQ44), which elevate the cedar end-grain 1 inch above concrete.
What is the best wood species for an outdoor garden arbor?
Western red cedar (Thuja plicata) and Alaskan yellow cedar are the premier choices due to their high natural concentrations of thujaplicins and polyphenols, which resist fungal decay and wood-boring insects. Redwood is an equally durable alternative in western states, while pressure-treated southern pine is an economical option that requires drying before staining.
How do you keep a garden arbor from racking or tipping in high wind?
A walkthrough arbor lacks solid shear walls. To eliminate lateral racking: (1) use interlocking half-lap joints between the 2x6 header beams and cross rafters; (2) secure beams with 3/8-inch galvanized through-bolts rather than nails; and (3) install structural 2x2 horizontal side climbing rungs fastened with two #10 ceramic screws per joint to form a rigid ladder truss on each flank.
Can vigorous vines like wisteria destroy a garden arbor?
Yes. Chinese or Japanese wisteria (Wisteria sinensis / floribunda) produce thick woody trunks that twist with immense mechanical torque, capable of snapping 4x4 posts and buckling rafter ties. For cedar arbors, choose non-destructive twiners like climbing roses, clematis (Clematis viticella), passionflower, or edible annuals like scarlet runner beans and table grapes.