How to Build a DIY Outdoor Pizza Oven Base (Concrete & CMU Block)

By Efraín Vega · Published November 16, 2026
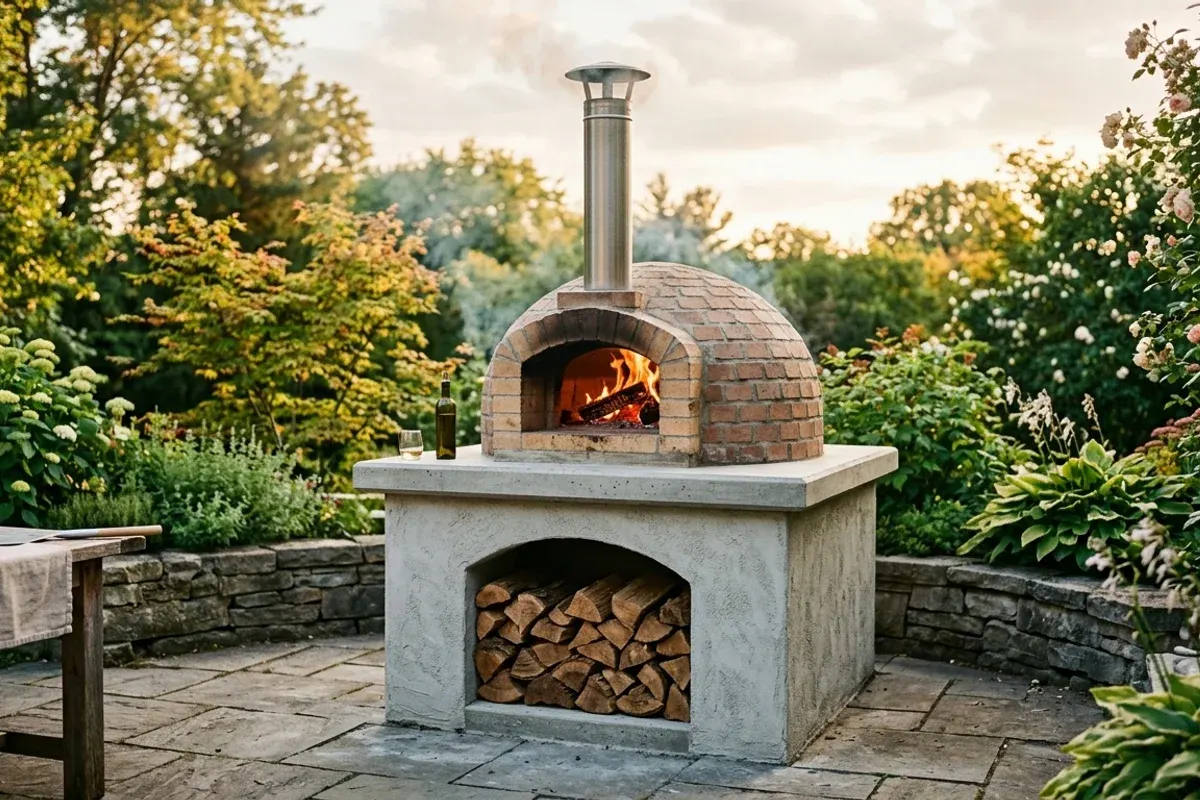
A wood-fired brick pizza oven is the crown jewel of an outdoor kitchen and backyard homestead. Reaching temperatures upwards of 850°F to 950°F, a traditional masonry oven bakes blistered, authentic Neapolitan pizzas in under 90 seconds while acting as a slow-roasting hearth for artisanal sourdough breads, braised meats, and roasted garden vegetables.
However, a masonry dome pizza oven is an unyielding, ultra-heavy structure: between the refractory firebricks, insulating vermiculite mortar, and dense chimney flue, an average 36-inch dome oven weighs over 1,500 pounds.
To prevent catastrophic settling, cracking, or heat damage, the foundation base must be engineered correctly. This guide provides comprehensive masonry blueprints for building a 5' x 5' heavy-duty cinder block (CMU) base, a suspended steel-reinforced concrete hearth, an integrated firewood storage arch, and a thermal heat-break layer.
The Thermal Break Rule: Structural Slab vs. Refractory Hearth
The #1 mistake first-time oven builders make is laying firebricks directly onto the poured concrete hearth slab. Standard Portland cement cannot survive direct firebox temperatures:
- Hydration Loss & Spalling: Portland cement relies on chemically bonded water crystals for compressive strength. Above 400°F, this chemical water vaporizes, turning standard concrete brittle and powdery. Trapped steam pockets can cause chunks of concrete to explode off the slab.
- Thermal Mass Thief: Solid concrete acts as a giant heat sink. If placed in direct contact with your cooking floor, the dense concrete base will continually suck heat downward away from the firebricks, preventing the oven floor from reaching the 750°F threshold required for crispy bottom crusts.
- The Solution: Always install a thermal isolation layer atop your structural slab before laying food-grade firebricks:
- Option A (Commercial): 2 inches of high-density calcium silicate insulation board (rated to 1,800°F).
- Option B (DIY Refractory Blend): A 3-inch layer of perlite-concrete or vermiculite-concrete (mixed at a 5:1 ratio of horticultural perlite to Portland cement with zero sand).
PIZZA OVEN HEARTH ELEVATION & THERMAL LAYERS

     [  FIRE & PIZZA  ]  ◄── 850°F - 950°F Intense Firebox Zone
    ┌─────────────────┐
    │ 2.5" FIREBRICK  │  ◄── Food-grade Refractory Firebricks (Herringbone)
    ├─────────────────┤
    │ 2"-3" INSULATION│  ◄── Thermal Break: Calcium Silicate or Perlite-Concrete
    ╞═════════════════╡
    │ 4" CONCRETE     │  ◄── Structural Suspended Slab (#4 Rebar Grid @ 6" OC)
    │ HEARTH SLAB     │      (Remains completely cool: < 110°F during firing)
    ├─────────────────┤
    │  CMU BLOCK CORE │  ◄── 8"x8"x16" Concrete Masonry Units (Rebar Pinned)
    └─────────────────┘
Base Dimensions & Ergonomic Blueprint
A 60-inch by 60-inch (5' x 5') footprint provides the ideal foundation size for any residential oven with a 32-inch to 38-inch interior cooking floor. It leaves a generous 6-inch landing shelf at the oven mouth to rest hot cast-iron pans and pizza peels.
| Architectural Component | Finished Dimension | Critical Specification |
|---|---|---|
| Ground Footing Slab | 62″ × 62″ × 5.5″ Deep | 4,000 PSI concrete over 4″ compacted crushed stone; #4 rebar grid |
| Masonry Base Height | 36 Inches (4.5 courses) | Standard 8×8×16 CMU block laid in Type S mortar; rebar in all corners |
| Firewood Arch Width | 32 Inches Wide × 28 Inches Tall | Arched alcove stores 1/4 face cord of split oak (Firewood Calculator) |
| Suspended Hearth Slab | 60″ × 60″ × 4″ Thick | 5,000 PSI concrete with 1.5″ cantilevered perimeter drip edge |
| Total Finished Height | 42.5 Inches to Hearth Floor | Ergonomic waist height for effortless pizza peel launching and hearth cleaning |
EXPLODED FOUNDATION & BASE SCHEMATIC:

         ◄──────────────── 60" Hearth Width ────────────────►
       ┌─────────────────────────────────────────────────────┐
       │   ===============================================   │ ◄── 4" Reinforced
       │   ||        SUSPENDED CONCRETE HEARTH          ||   │     Concrete Slab
       │   ===============================================   │
       │   ┌────────┐                           ┌────────┐   │ ▲
       │   │ [8x8]  │   FIREWOOD STORAGE ALCOVE │ [8x8]  │   │ │ 36" Working
       │   │  CMU   │   32" Wide x 28" Height   │  CMU   │   │ │ Masonry
       │   │ BLOCK  │   (Holds Split Hardwood)  │ BLOCK  │   │ │ Height
       │   │  WALL  │                           │  WALL  │   │ │
       │   └────────┘                           └────────┘   │ ▼
       ╞═════════════════════════════════════════════════════╡
       │   4" MONOLITHIC GROUND FOOTING SLAB WITH REBAR GRID │
       └─────────────────────────────────────────────────────┘
Materials & Concrete Estimate (5' x 5' Pizza Oven Base)
Building a base that supports 4,000+ pounds requires robust masonry materials:
Concrete & Mortar:
- Ground Slab Concrete: 14 bags (60 lb) or 11 bags (80 lb) of 4,000 PSI concrete mix. Check volume using our Concrete Slab Calculator.
- Suspended Hearth Concrete: 13 bags (80 lb) of 5,000 PSI high-early-strength commercial concrete mix (e.g., Quikrete 5000).
- Type S Masonry Mortar: 4 to 5 bags (80 lb) for laying CMU cinder block courses.
- Core-Fill Grout: 6 bags (80 lb) of gravel mix concrete to fill vertical rebar cells.
Masonry & Steel Reinforcement:
- Concrete Masonry Units (CMU): 38 standard 8×8×16 hollow-core cinder blocks and 6 half-blocks (8×8×8). Check quantities with our Cinder Block Calculator.
- Steel Rebar: 8 lengths of 10-foot #4 (1/2-inch) Grade 60 rebar.
- Sub-base Gravel: 0.6 cubic yards (approx. 1,600 lbs) of clean #57 crushed stone.
Hearth Insulation & Formwork:
- Formwork Lumber: One 4×8 sheet of 3/4-inch CDX exterior plywood, four 2×4×8' boards for perimeter form rails, and four 2×4s for temporary shoring posts.
- Sub-Hearth Insulation: Two 3' x 3' sheets of 2-inch calcium silicate board OR three 4-cu-ft bags of horticultural perlite mixed 5:1 with Portland cement.
- Cooking Floor: 50 medium-duty refractory firebricks (9" × 4.5" × 2.5").
Step-by-Step Construction Guide
Step 1: Excavate and Pour the Ground Footing Slab
Never pour a pizza oven footing directly on loose topsoil.
- Excavate a 64×64-inch square to a depth of 10 inches.
- Tamp native soil, then spread and compact 4 inches of clean #57 crushed limestone gravel using a mechanical plate compactor or hand tamper.
- Build a 2x6 lumber form (62" inside dimensions). Lay a grid of #4 rebar elevated 2 inches off the gravel on plastic rebar chairs, spaced 12 inches on center.
- Pour 4,000 PSI concrete to a depth of 5.5 inches. Screed flat, tap the form sides to release air voids, and insert four 24-inch L-shaped vertical rebar starter pins into the wet concrete where the block corners will sit.
- Keep the slab damp and let it cure for a minimum of 5 days before laying heavy block.
Step 2: Lay the CMU Cinder Block Walls
The base is shaped like a "U", leaving the front open for wood storage while the back and two sides carry the oven load:
- Mix Type S mortar to a peanut-butter consistency. Lay a 1/2-inch mortar bed directly onto the cured footing.
- Set your four corner blocks first, ensuring they are perfectly square (check diagonals: 60" × 60" should measure 84-7/8 inches corner-to-corner).
- Lay the blocks in a staggered running bond across 4.5 courses (reaching 36 inches in height).
- Drop continuous 36-inch vertical rebar lengths down through each open corner cell, connecting with the starter pins in the foundation slab.
- Pour wet concrete grout into the rebar cells and rod vigorously with a stick to consolidate. This ties the block walls and footing into a single indestructible monolith.
CMU BLOCK LAYOUT (TOP VIEW OF "U" SHAPED BASE)

             ◄──────── 60" Back Wall ────────►
          ┌────────┬────────┬────────┬────────┐
          │  [8x8] │ [8x8]  │ [8x8]  │  [8x8] │
          ├────────┴────────┴────────┴────────┤
       ▲  │                                   │  ▲
       │  │ [8x8]                       [8x8] │  │
       │  │                                   │  │ 60"
   60" │  │ [8x8]    OPEN FIREWOOD      [8x8] │  │ Side
  Side │  │          STORAGE CAVITY           │  │ Walls
  Wall │  │ [8x8]    (32" Span)         [8x8] │  │
       │  │                                   │  │
       ▼  │ [8x8]                       [8x8] │  ▼
          └───────┘                   └───────┘
                     ◄── 32" Front ──►
                         Opening
Step 3: Build the Suspended Hearth Formwork
Because the center of the base is open for firewood storage, the concrete hearth slab must bridge across the 32-inch opening:
- Cut 3/4-inch CDX plywood to fit precisely inside the interior pocket of the "U" walls.
- Support this horizontal plywood deck from below inside the firewood alcove using four vertical 2x4 posts wedged tightly against cross-bearers resting on the ground slab.
- Screw 2x6 form boards around the exterior perimeter of the CMU walls, propping the top edge 4 inches above the top of the blocks.
Step 4: Tie the Rebar Grid & Pour the 5,000 PSI Hearth
- Lay a heavy-duty grid of #4 rebar on 1.5-inch rebar chairs across the formwork deck. Space bars 6 to 8 inches on center in both directions, wiring every intersection with 16-gauge tie wire.
- Pour 5,000 PSI concrete into the formwork, filling the deck to a depth of 4 inches.
- Vibrate the concrete along the exterior form rails with a rubber mallet to eliminate honeycombing.
- Screed the top dead-level with a straight 2x4. Trowel smooth with a magnesium float.
- Cover with plastic sheeting and mist with water daily. Allow the slab to cure for 14 days before knocking out the temporary 2x4 shoring posts beneath the firewood arch.
Step 5: Install the Sub-Hearth Insulation & Firebrick Floor
- Lay 2-inch calcium silicate insulation boards directly onto the dry concrete slab (or pour a 3-inch layer of 5:1 perlite/Portland cement slurry and let dry for 3 days).
- Dry-lay your food-grade refractory firebricks atop the insulation layer in a tight herringbone pattern.
- A herringbone orientation prevents the edge of metal pizza peels from catching on brick seam edges when sliding pies in and out.
- Tap firebricks level using a dead-blow rubber mallet and a 4-foot level. Sweep fine refractory mortar sand into the hairline seams.
Your rock-solid base is now ready to support your custom brick dome, refractory cast oven, or commercial modular pizza oven kit for decades of wood-fired culinary perfection.
FAQ
How thick should a concrete hearth slab be for an outdoor pizza oven?
The structural concrete hearth slab must be a minimum of 4 inches thick (ideally 4.5 to 5 inches) reinforced with a continuous grid of #4 (1/2-inch) rebar spaced 6 to 8 inches on center. A finished brick dome oven weighs between 1,200 and 2,500 pounds; a thinner or unreinforced slab will crack and deflect under that concentrated dead load.
Can regular concrete withstand the high heat of a pizza oven fire?
No. Standard Portland cement concrete decomposes, loses structural tensile strength, and spalls violently when exposed to temperatures exceeding 400°F–500°F (wood fires easily exceed 900°F). You must install a 2- to 3-inch sub-hearth thermal insulation barrier (calcium silicate board or an expanded perlite/vermiculite refractory cement blend) directly between the structural slab and your food-grade firebrick floor.
What is the ideal ergonomic countertop height for a pizza oven hearth?
The standard ergonomic hearth height is between 40 and 44 inches off the ground (roughly elbow height of the primary cook). This allows you to launch pizzas, stoke hardwood embers, and inspect cooking crusts with a turning peel without bending over or straining your lower back.
How much does a typical DIY brick pizza oven and masonry base weigh?
A standard 36-inch interior dome oven and masonry base has an aggregate weight of 3,500 to 5,000 pounds: the ground foundation slab (~1,200 lbs), CMU cinder blocks and core-fill grout (~1,500 lbs), suspended hearth slab (~900 lbs), and firebrick dome with refractory mortar (~1,200 lbs). It cannot be built on top of standard patio pavers without a dedicated sub-grade footing.
Can you build an outdoor pizza oven base directly over existing patio pavers?
Never build directly onto decorative patio pavers or sand-set walkways. Standard 2-inch pavers set on crushed limestone sand cannot carry 4,000+ pounds of concentrated dead load; the ground beneath will settle unevenly, tilting the oven and fracturing the refractory dome. Always cut through existing pavers and pour a 4- to 6-inch reinforced concrete footing bearing on undisturbed native subsoil.
What is the best wood to store in the lower pizza oven firewood alcove?
Dense, well-seasoned hardwoods like White Oak, Hard Maple, Beech, Ash, and Pecan with moisture levels under 20%. Seasoned hardwoods burn clean at 800°F–900°F with minimal creosote smoke, producing the intense radiant coal bed needed for 90-second Neapolitan pizzas. Avoid resinous softwoods like pine, fir, or cedar, which impart acrid tar tastes.