How to Build a DIY Cedar Window Box Planter (French Cleat System)

By Efraín Vega · Published November 15, 2026
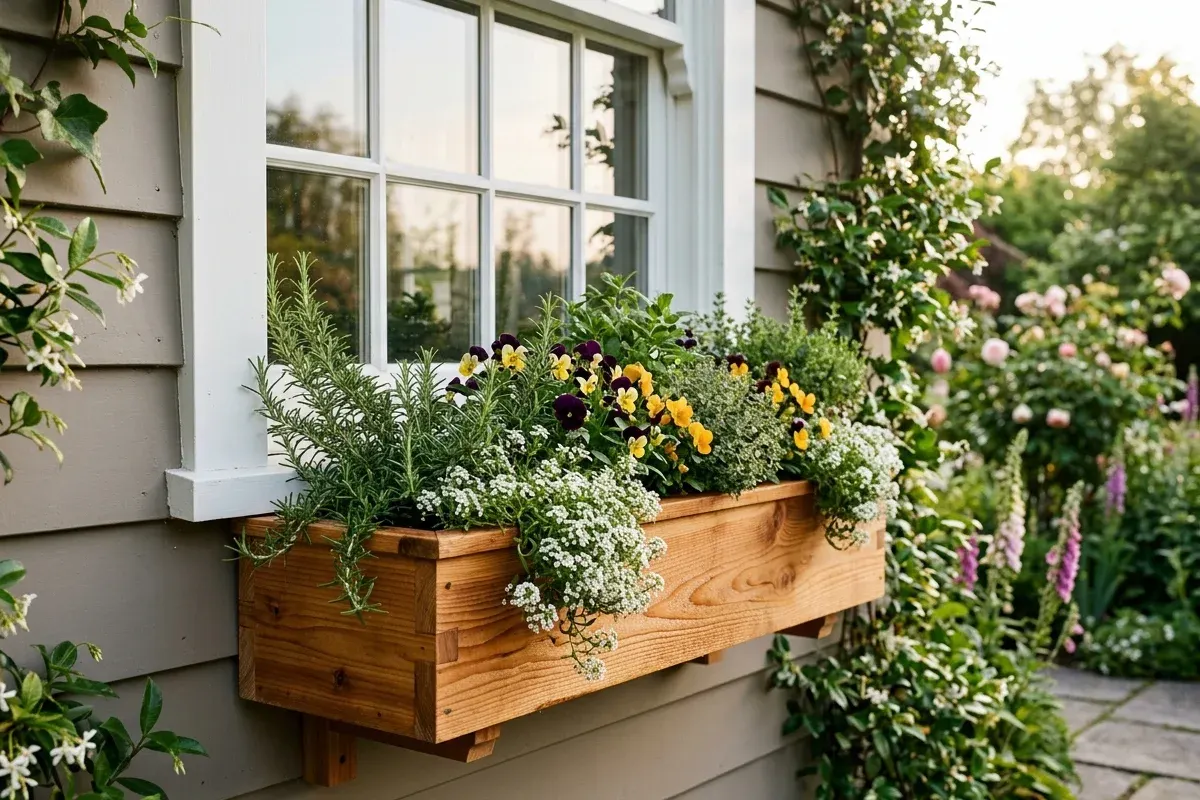
Window boxes provide instant cottage charm and architectural depth to any home facade. However, many store-bought window planters suffer from two fatal flaws: they are constructed from cheap pine that rots after three seasons, or they are screwed flush against exterior siding, trapping irrigation runoff that rots wall sheathing.
This DIY woodworking plan solves both problems. Built from decay-resistant Western red cedar and mounted with a heavy-duty 45-degree French cleat, this planter floats 1/2 inch off the house wall for zero moisture entrapment. Best of all, the entire box lifts off its wall bracket in seconds for easy replanting or winter storage.
┌────────────────────────────────────────────────────────┐
│           THE CONCEALED FRENCH CLEAT SYSTEM            │
├────────────────────────────────────────────────────────┤
│                                                        │
│  House Wall Siding                                     │
│  │   Wall Stud                                         │
│  │   │                                                 │
│  │   │  [Upper Cleat - Attached to Box] (Bevel Down)   │
│  │   │      \───────┐                                  │
│  │   │       \  ▲   │ <── Planter Back Board           │
│  │   │        \ │   │                                  │
│  │   │─────────\┼───┘                                  │
│  │   │          \                                      │
│  │   │───────────\                                     │
│  │   │  ▲         \                                    │
│  │   │  │ [Lower Cleat - Lagged to Studs] (Bevel Up)   │
│  │   │  │                                              │
│  │◄──┴──┴── 1/2" Air Gap (Convective Drainage Chimney) │
└────────────────────────────────────────────────────────┘
Materials & Cutting List (For a 48" Window Box)
The dimensions below yield a finished window box 48" long, 8" deep, and 7-1/4" tall—ideal for standard 36" to 42" windows with surrounding trim. Adjust the length to match your specific window casing width.
Lumber Requirements (Rough or S4S Western Red Cedar)
- 1x8 Cedar (Nominal 3/4" x 7-1/4" actual):
- Front Panel: 1 @ 48"
- Back Panel: 1 @ 48"
- Bottom Base: 1 @ 46-1/2" (ripped to 6-1/2" wide)
- End Caps: 2 @ 6-1/2" wide x 7-1/4" tall
- 2x4 Cedar (Nominal 1-1/2" x 3-1/2" actual):
- French Cleat Stock: 1 @ 46" (ripped down the center at a 45° bevel)
- Fasteners & Supplies:
- 1 box #8 x 2" trim-head stainless steel or ceramic-coated exterior screws
- 1 box #10 x 3-1/2" exterior structural screws (for wall mounting)
- 1 bottle Titebond III Ultimate waterproof wood glue
- 100% silicone exterior sealant / caulk
- 4 nylon or composite 1/2" spacer washers (wall standoffs)
Step-by-Step Construction Guide
Step 1: Precision Crosscuts & Sizing
Measure the total exterior width of your window casing (including the outside edge of the vertical trim). For a harmonious proportion, size your front and back panels to equal this measurement plus 1 inch.
Crosscut your 1x8 cedar boards using a miter saw equipped with a fine 60-tooth carbide blade to prevent tearout on the soft cedar grain:
- Cut Front & Back panels to exactly 48".
- Cut the two End Caps to 6-1/2" wide by 7-1/4" tall.
- Cut the Bottom floor to 46-1/2" long, and rip it on a table saw to 6-1/2" wide.
Step 2: Drainage Hole Drilling
Standing water will drown roots and accelerate wood rot. Invert the bottom floor board:
- Mark a centerline along the 46-1/2" bottom board.
- Using a 3/4" spade bit or Forstner bit, drill drainage holes every 6 inches along the board.
- Lightly countersink both sides of the holes with 120-grit sandpaper to remove rough splinters.
       BOTTOM FLOOR BOARD DRAINAGE HOLE PATTERN:
  ┌─────────────────────────────────────────────────────────┐
  │   (O)       (O)       (O)       (O)       (O)       (O)   │
  └─────────────────────────────────────────────────────────┘
      ◄──── 6" ────►
Step 3: Box Assembly with Waterproof Joinery
Western red cedar swells and shrinks slightly with moisture cycles. Always pre-drill countersunk pilot holes to prevent edge splitting:
- Recess the Bottom Floor: Set the bottom floor board 3/4 inch up from the bottom edges of the front, back, and end caps. Recessing the floor creates a drip-edge perimeter that prevents water from wicking along the base joints.
- Apply Waterproof Adhesive: Apply a generous bead of waterproof exterior wood glue (ANSI Type I, such as Titebond III) along all mating edges.
- Drive Trim Screws: Clamp the assembly square. Drive #8 x 2" stainless steel trim-head screws every 4 inches through the front and back panels into the floor and end caps. The small trim heads sink flush below the cedar surface for a clean, fastener-free appearance.
Fabricating the 45° French Cleat
The French cleat is the gold standard of architectural hanging. When the beveled planter cleat nests over the wall cleat, downward gravity pulls the planter tight against the wall.
┌────────────────────────────────────────────────────────┐
│           RIPPING THE 45° BEVEL ON A TABLE SAW         │
├────────────────────────────────────────────────────────┤
│           2x4 Cedar Stock (1-1/2" x 3-1/2")            │
│       ┌──────────────────────┐                         │
│       │                      │                         │
│       │         /            │ <- 45° Table Saw Blade  │
│       │        /             │                         │
│       └───────/──────────────┘                         │
│                ▲                                       │
│    Produces TWO matching beveled cleats:               │
│    1. Box-Mounted Cleat (Bevel facing DOWN & IN)       │
│    2. Wall-Mounted Cleat (Bevel facing UP & OUT)       │
└────────────────────────────────────────────────────────┘
- Rip the 2x4: Tilt your table saw blade to 45 degrees. Rip a 46-inch long 2x4 cedar board down the exact center. This yields two identical mating halves.
- Mount the Upper Cleat to the Planter:
- Position one beveled strip flush against the top-inside back of the cedar box (or along the top-exterior back).
- Orient the 45° bevel facing downward and inward toward the box.
- Pre-drill and secure with glue and 2-1/2" exterior screws from inside the box into the cleat.
Safe Wall Mounting & Siding Protection
Never mount a heavy planter solely to exterior siding or sheathing. Fasteners must bite deep into structural framing studs:
- Locate Wall Studs: Use an electronic stud finder or locate stud nails on your lap siding. Exterior wall studs are centered 16 inches apart beneath the window.
- Level the Lower Wall Cleat: Hold the wall cleat against the siding, 2 inches below the window sill trim. Orient the bevel facing upward and outward. Use a 4-foot torpedo level to ensure the bracket is dead level.
- Install Nylon Standoff Spacers: Slide 1/2" thick nylon or composite washers between the back of the cedar cleat and your siding. This creates the essential 1/2" air space that prevents siding rot and allows siding laps to sit flat.
- Fasten to Studs: Pre-drill pilot holes through the cleat, spacers, and siding into the studs. Drive #10 x 3-1/2" structural screws into at least three studs. Inject silicone sealant into each hole before driving the screw to seal against rain intrusion.
- Hang the Box: Lift the finished planter and lower it onto the wall cleat. The angled bevels lock together with zero play.
Planting Media & Drainage Layering
A window box has limited soil volume and bakes in direct sunlight. Ordinary topsoil turns into an oxygen-starved brick after three waterings:
| Component | Proportion by Volume | Purpose & Function |
|---|---|---|
| High-Grade Potting Soil | 50% | Peat moss or coco coir base for moisture retention and light aeration. |
| Mature Screened Compost | 30% | Delivers organic biology, micronutrients, and slow-release nitrogen. |
| Horticultural Perlite or Vermiculite | 20% | Prevents compaction; maintains oxygen channels to root hair tips. |
| Controlled-Release Fertilizer | 1/2 Cup | Feeds heavy-blooming annuals continuously over a 90-day cycle. |
- Calculate your potting soil and compost bag counts using our Potting Soil Calculator.
- Line with Landscape Fabric: Lay a strip of breathable geotextile weed barrier cloth across the interior bottom of the box before adding soil. This prevents soil from washing out through the 3/4" drainage holes while allowing excess water to drain freely.
Plant Selection Recipes for Sun & Shade
Design your window box with the classic horticultural principle: Thrillers (height), Fillers (mounding body), and Spillers (trailing overhang):
┌────────────────────────────────────────────────────────┐
│            THE THREE-TIER PLANTING COMPOSITION         │
├────────────────────────────────────────────────────────┤
│           /\           /\           /\                 │
│          /  \         /  \         /  \   <- THRILLERS │
│         (####)       (####)       (####)  (Centerpiece)│
│        ░░░░░░░░░░░░░░░░░░░░░░░░░░░░░░░░░░░             │
│        ▒▒▒ FILLERS (Lush Mounding Greens) ▒▒▒          │
│       \ \ \ \ \ \ \ \ \ \ \ \ \ \ \ \ \ \ \            │
│        \ \ \ \ SPILLERS (Cascading Trails) \ \ \       │
└────────────────────────────────────────────────────────┘
Full-Sun Kitchen Herb Box (South/West Exposure)
- Thriller: Upright French Rosemary or Sweet Thai Basil.
- Filler: Chives, Curly Parsley, and Compact Greek Oregano.
- Spiller: Trailing English Thyme and Variegated Nasturtiums.
Shaded Cottage Floral Box (North/East Exposure)
- Thriller: Upright Fuchsias or Coleus.
- Filler: Polka Dot Plants, Tuberous Begonias, and Persian Shield.
- Spiller: Creeping Jenny (Lysimachia), Variegated English Ivy, and Bacopa.
Frequently Asked Questions
Can I leave my cedar window box outdoors over winter?
Yes. Western red cedar withstands sub-zero freezes and snow without cracking. However, if planting perennials, soil in above-ground boxes can freeze solid, damaging root systems in Zones 3 through 6. Thanks to the French cleat, you can easily lift the entire box down and store it in an unheated garage, or cover it under a DIY cold frame for winter protection.
How often should window boxes be watered?
During peak summer heat, small container root systems dry out rapidly. South-facing window boxes require watering once every morning. To automate maintenance, route a micro 1/4" drip line with 0.5 GPH pressure-compensating emitters from a hose timer up behind the siding into the box.
Should I apply a wood sealer or stain to the cedar?
Western red cedar can be left completely untreated; it will naturally weather into a graceful silver-gray patina over 2 to 3 years. If you prefer to preserve the rich amber hue, apply an exterior penetrating semi-transparent oil stain (such as Penofin or Cabot Australian Timber Oil) before planting. Avoid film-forming polyurethane varnishes, which peel and trap moisture.
FAQ
Will a wooden window box cause rot or mildew on house siding?
Directly screwing a wet wooden planter against siding guarantees moisture entrapment, peeling paint, and fungal rot. The solution is a French cleat mount with 1/2-inch composite or nylon wall standoffs. This creates an open convective chimney that lets air circulate freely and rainwater drain harmlessly down the siding.
How much weight can a French cleat window box hold when wet?
A 48-inch cedar window box packed with wet potting mix, root balls, and saturated plants weighs between 70 and 110 lbs. A 45-degree beveled 2x4 cedar French cleat anchored into three exterior wall studs with #10 x 3-1/2-inch structural screws comfortably supports over 300 lbs—a 3:1 safety margin.
What is the best proportion and length for a window box?
Aesthetically, a window box should match the exact outer width of your window trim casing, or extend 1 to 2 inches past the trim on either side. Avoid making the box narrower than the glass window frame, which makes the exterior look top-heavy and unbalanced.
What is the best soil mix for window boxes?
Never use dense backyard garden topsoil. In a container, topsoil compacts into a brick and drowns roots. Use a 50/50 blend of lightweight potting soil (peat moss/coco coir and perlite) mixed with mature screened compost and slow-release organic fertilizer.
Should I plant directly into cedar or use plastic drop-in liners?
Western red cedar contains natural thujaplicin oils that naturally resist decay for 15+ years when direct-planted. However, using removable plastic liner inserts makes planting, seasonal flower swaps, and winter storage significantly easier without disturbing the wall-mounted box.