How to Build a Freestanding DIY Cedar Garden Privacy Screen

By Efraín Vega · Published November 15, 2026
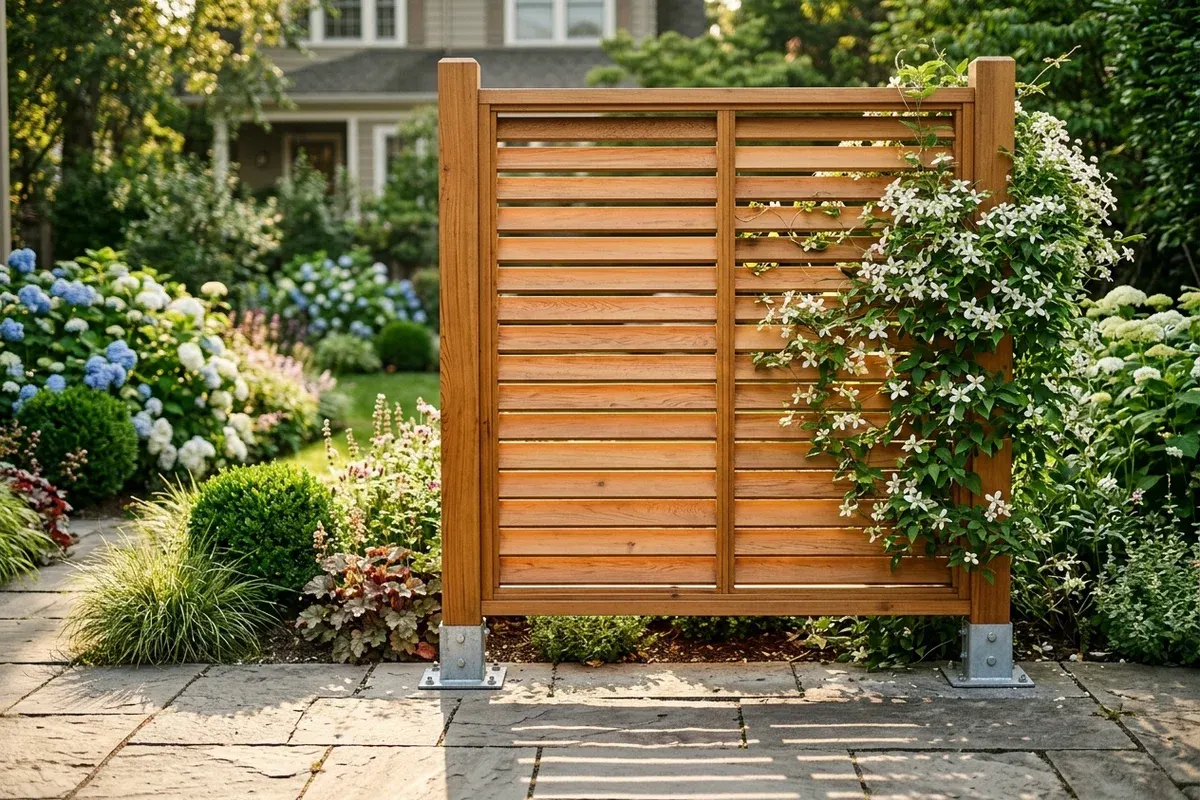
Whether you want to screen off noisy neighbors, conceal unsightly air conditioning units and pool pumps, or create a cozy outdoor dining alcove on your patio, a freestanding privacy screen is one of the highest-impact weekend landscape upgrades you can build.
However, many prefabricated store-bought privacy lattice panels are made from flimsy stapled pine that buckles under the first heavy thunderstorm. A true architectural privacy screen requires sturdy 4x4 structural cedar posts, heavy-duty mounting footings, and aerodynamic horizontal louver spacing that blocks sightlines while letting wind pass through safely.
┌────────────────────────────────────────────────────────┐
│           6-FOOT CEDAR PRIVACY SCREEN ELEVATION        │
├────────────────────────────────────────────────────────┤
│                 72" Post-to-Post Span                  │
│   ┌────────────────────────────────────────────────┐   │
│   │ [2x6 Cedar Top Cap / Architectural Cornice]    │   │
│   ├────────────────────────────────────────────────┤   │
│   │  4x4 Post                               4x4    │   │
│   │  │   ═══════════════════════════════   │ Post  │ ▲ │
│   │  │   ═══════════════════════════════   │   │   │ │ │
│   │  │   Horizontal 1x4 S4S Cedar Slats    │   │   │ 72"│
│   │  │   (1/2" Air Gap for Wind Relief)    │   │   │ │ │
│   │  │   ═══════════════════════════════   │   │   │ ▼ │
│   └──┴─────────────────────────────────────┴───┴───┘   │
│      │                                         │       │
│   [Heavy-Duty Galvanized Post Shoe or Footing] │       │
│   ══════════════════════════════════════════════════   │
│   ◄─── Concrete Patio Slab or Flagstone Paver Base ──► │
└────────────────────────────────────────────────────────┘
Wind Load Physics: The Sail Effect vs. Slatted Louvers
Before cutting lumber, understand the structural physics of outdoor vertical walls.
A solid 6-foot by 6-foot panel creates 36 square feet of unbroken sail area. In a moderate 40 mph wind gust, that solid panel experiences over 180 lbs of continuous overturning lateral force at its top edge. This leverage will quickly crack surface lag screws or bend light metal brackets.
┌────────────────────────────────────────────────────────┐
│               SOLID PANEL VS. SLATTED LOUVERS          │
├────────────────────────────────────────────────────────┤
│ SOLID WALL (Catastrophic Sail):                        │
│   Wind ────► [ |||||||||||||||||||| ] (Zero pass-thru) │
│              Forces 180+ lbs overturn pressure!        │
│                                                        │
│ SLATTED LOUVERS (Aerodynamic Relief):                  │
│   Wind ────► ═══════════════════                       │
│        ────► ─── 1/2" Air Gap ── (Bleeds 40% pressure) │
│        ────► ═══════════════════                       │
│                                                        │
│ RESULT: Complete visual privacy at eye level with 40%  │
│ less torque on the foundation post shoes!              │
└────────────────────────────────────────────────────────┘
By introducing consistent 1/2-inch gaps between horizontal 1x4 slats, wind bleeds harmlessly through the wall. Because human sightlines are angular, adjacent yards see only unbroken wood, while the panel survives severe storm gusts with ease.
Foundation Options: Soil vs. Patio Surface
The mounting method determines the longevity and stability of your privacy screen:
| Foundation Type | Structural Method | Fasteners & Hardware | Best Use Case |
|---|---|---|---|
| In-Ground Concrete Footings | 10" diameter augered hole, 30"–36" deep (below frost depth) | 2 bags (100 lbs) 5,000 PSI concrete per post; 4" gravel base | Lawn borders, garden perimeters, or open landscape turf. |
| Existing Concrete Slab Pad | Surface-mounted heavy-gauge galvanized post bases | 1/2" x 4-1/2" zinc-plated wedge expansion anchors or Simpson Titen HD screws | Poured concrete patios, carport pads, or poolside decking. |
| Dry-Laid Flagstone Pavers | Core drill through flagstone into sub-base concrete piers | Stainless steel threaded rod epoxied into subsurface concrete footings | Flagstone patios and interlocking paver walkways. |
- If pouring in-ground footings, calculate exact concrete requirements with our Concrete Footing Calculator.
Materials & Cutting List (For a 6' x 6' Screen)
Structural Framing (Western Red Cedar)
- Main Upright Posts: 2 @ 4x4 Cedar (8-foot length for in-ground; or cut to 72" for surface shoes)
- Horizontal Slat Rails (1x4 S4S Cedar, nominal 3/4" x 3-1/2" actual):
- Horizontal Slats: 17 boards @ 69" (cut to fit snugly between posts)
- Vertical Stop Cleats (1x2 Cedar, nominal 3/4" x 1-1/2"):
- Internal Stop Cleats: 4 @ 68" (creates an internal recessed channel for slats)
- Top Cap Rail (Architectural Cornice):
- 1 @ 2x6 Cedar @ 76" (provides a 2-inch overhang on either side to shed rain)
Hardware & Supplies
- 2 Simpson Strong-Tie ABU44 or MPB66 heavy-duty 4x4 post bases (for patio surface mount)
- 4 1/2" x 4-1/2" concrete wedge anchors
- 1 box #8 x 1-5/8" stainless steel trim-head screws
- 1 box #10 x 3" exterior structural framing screws
- Exterior waterproof wood adhesive (Titebond III)
Step-by-Step Construction Guide
Step 1: Post Installation & Alignment
- Mark Post Centers: Measure exactly 72-1/2 inches between the centers of your two post locations (yielding a 69-inch clear span between 4x4 posts).
- Anchor Post Shoes: When anchoring to a concrete patio, position the galvanized post bases. Drill 1/2-inch holes into the slab using a rotary hammer drill. Blow out concrete dust and drive 1/2" x 4-1/2" wedge anchors, torquing nuts to 55 ft-lbs.
- Plumb and Secure Posts: Seat your 4x4 cedar posts into the brackets. Secure with 1-1/2" structural connector screws. Use a 4-foot spirit level on two adjacent faces to guarantee posts are dead plumb.
       POST BASE SHOE PATTERN ON CONCRETE PATIO
  ┌─────────────────────────┐
  │      4x4 Cedar Post     │
  │     ┌─────────────┐     │
  │     │             │     │
  │     └─────────────┘     │
  │   [Galvanized Shoe]     │
  └───┬─────────────────┬───┘
      │ (Wedge Anchor)  │ (Wedge Anchor)
  ════╧═════════════════╧════  <- Concrete Patio Slab
Step 2: Installing the Slat Stop Cleats
Rather than toe-screwing individual slats into the posts—which looks clumsy and splits wood—use the elegant double-cleat sandwich method:
- Cut four 1x2 cedar strips to 68 inches long.
- Fasten one 1x2 cleat vertically down the inside face of each 4x4 post, setting it 3/4 inch back from the front post edge. Secure with 2" trim screws every 12 inches.
- This creates a solid rear backstop that holds your horizontal slats perfectly straight and flush.
┌────────────────────────────────────────────────────────┐
│            THE DOUBLE-CLEAT SLAT SANDWICH              │
├────────────────────────────────────────────────────────┤
│                 4x4 Post (Cross-Section)               │
│             ┌─────────────────────────┐                │
│             │                         │                │
│             │  [1x2 Rear Stop Cleat]  │                │
│             │  ┌─────┐                │                │
│             │  │     │ [1x4 Slat]     │                │
│             │  │     │ ┌────────────  │                │
│             │  └─────┘ │              │                │
│             │  [1x2 Front Face Cleat] │                │
│             │  ┌─────┐ │              │                │
│             │  │     │ └────────────  │                │
│             │  └─────┘                │                │
│             └─────────────────────────┘                │
└────────────────────────────────────────────────────────┘
Step 3: Fastening Horizontal Slats with Spacers
- Cut seventeen 1x4 cedar boards to exactly 69 inches long (or the precise gap between your posts).
- Prepare two 1/2-inch plywood spacer blocks.
- Place the first 1x4 slat against the rear stop cleat at the bottom, sitting 2 inches above the patio floor to prevent ground-moisture wicking.
- Drive two #8 x 1-5/8" stainless steel screws through the face of the board into the post cleat.
- Place the 1/2-inch spacer blocks on top of the first slat, set the second slat on top, and fasten. Repeat all the way up the wall.
- Once all slats are installed, screw the matching 1x2 front stop cleats over the board ends, sandwiching the slats invisibly inside a clean architectural shadow channel.
Step 4: Installing the Architectural 2x6 Top Cap
A top cap rail ties the posts together and protects the porous end grain of the 4x4 posts from rainwater rot:
- Cut a 2x6 cedar board to 76 inches long.
- Route a subtle 1/8-inch chamfer along the top edges with a palm router or sander.
- Center the 2x6 atop the posts, providing a 2-inch overhang on the ends and 1-inch overhang on the front and back.
- Pre-drill and drive two 3" exterior structural screws through the cap down into the center of each 4x4 post.
Finishing & Plant Integration
Western red cedar contains natural tannins that resist decay. However, sun exposure weathers unprotected cedar to silver-gray within 18 months:
- Preserving Warm Amber Cedar Tones: Apply two coats of a high-solids penetrating exterior oil stain (such as Messmer's UV Plus or Penofin Cedar tone) with ultraviolet blockers.
- Trellis Vine Pairings: Soften the clean architectural lines by training lightweight flowering climbers:
- Sweet Autumn Clematis: White starry fragrant blooms that weave through the 1/2" slats.
- Climbing Thyme & Lavender Border: Plant dense aromatic herbs at the base to deter patio mosquitoes.
- Star Jasmine (Trachelospermum jasminoides): In Zones 8 to 10, provides evergreen dark green leaves and sweet perfumed blossoms.
Frequently Asked Questions
Can this privacy screen be built on an existing wooden deck?
Yes! Fasten the 4x4 posts directly to the structural perimeter rim joist and blocking beneath the deck boards using 1/2-inch galvanized carriage bolts with heavy washer plates. Never screw posts solely into surface 5/4 deck boards.
How do I build a zigzag or multi-panel corner privacy screen?
If you want an L-shaped corner screen (ideal for enclosing a hot tub or outdoor kitchen), set a shared 4x4 corner post and run perpendicular 1x4 slats in both directions. The 90-degree corner geometry inherently braces the structure against wind loads from all compass directions.
How much does it cost to build this DIY cedar screen vs. hiring a contractor?
Building this 6x6-foot Western red cedar screen yourself costs between $240 and $320 in materials (cedar lumber, stainless fasteners, and post bases). Professional fence and landscape contractors typically quote $800 to $1,400 for an equivalent custom craftsman-built cedar partition.
FAQ
Can a 6-foot privacy screen stand freestanding without blowing over in strong wind?
Yes, but you must account for lateral wind load. A solid wooden wall acts like a sail, catching gusts that shear fasteners or topple posts. By leaving a 1/2-inch to 3/4-inch gap between horizontal cedar louvers, wind pressure bleeds through harmlessly while maintaining 85% to 90% visual sightline privacy.
Should I set privacy screen posts in concrete or use bolt-down surface brackets?
If installing on turf or soil, always dig 30- to 36-inch deep post holes and pour concrete footings. If installing on an existing concrete patio or deck, use heavy-duty 12-gauge galvanized steel post base shoes (such as Simpson Strong-Tie ABU44 or MPB66) anchored with 1/2-inch wedge anchors.
What is the best slat spacing for an outdoor privacy screen?
A 1/2-inch gap is the ideal balance for residential screening. From 10 feet away, sightlines into your outdoor living space or equipment are completely obstructed, yet the air permeability relieves 40% of the total static wind pressure on posts.
What wood species is best for outdoor privacy screens?
Western red cedar is the premier choice due to its high strength-to-weight ratio, crisp dimensional stability, and natural resistance to rot and carpenter bees. S4S (surfaced four sides) cedar boards stay flat and straight, unlike treated pine which warps, twists, and cups under direct sun.
Can climbing vines damage a cedar privacy screen?
Vigorous woody twining vines with aerial rootlets (like English ivy or wisteria) can pry slats apart and trap destructive moisture against the wood. Opt for lightweight herbaceous climbers that twine with leaf tendrils, such as sweet autumn clematis, climbing nasturtiums, or annual morning glories.