How to Build a DIY Cedar Potting Bench with Sink and Storage

By Efraín Vega · Published November 13, 2026
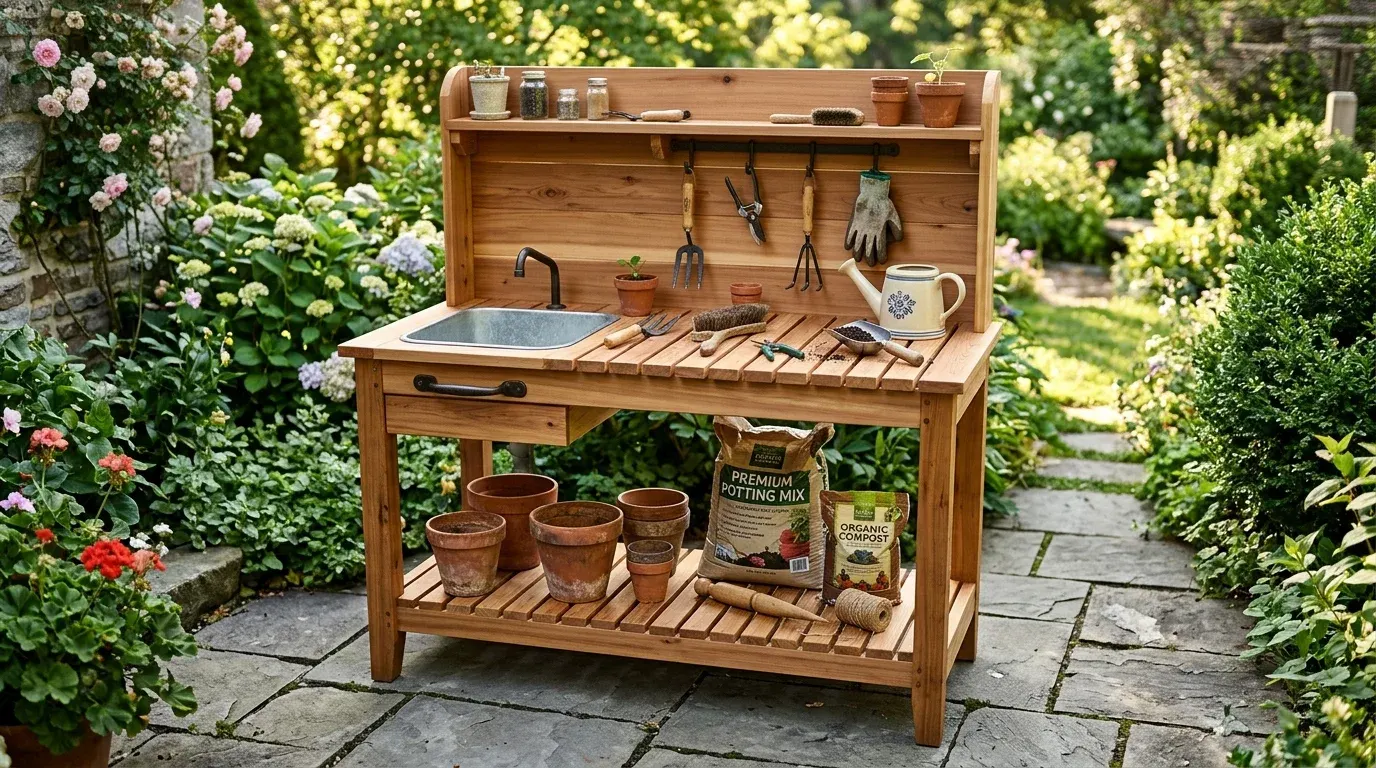
An outdoor potting bench is the operational command center of a productive backyard garden. Instead of hunching over on your knees in the grass or scattering messy soil bags across the patio table, a dedicated workstation keeps your terracotta pots, pruners, trowels, and potting soil organized at a comfortable standing height.
This plan uses rot-resistant Western Red Cedar with an ergonomic 36-inch counter height, a recessed dry sink basin for catching loose compost, and heavy-duty lower slatted storage capable of holding four 50-pound bags of soil.
Bench Dimensions & Overview
                          [Top Tool / Seed Shelf: 6" Deep]
                                  ||================|| (56" Height)
                                  ||                ||
                   [Pegboard / Tool Rails / Hanging Hooks]
                                  ||                ||
  ==================================================================== (36" Counter Height)
  ||  [Main Worktop: 48" Wide x 24" Deep]     [Recessed Sink Basin] ||
  ||================================================================||
  ||                                                                ||
  ||                                                                ||
  ||================================================================|| (10" Off Ground)
  ||           [Lower Slatted Soil & Pot Storage Shelf]             ||
  ||================================================================||
  ==================================================================== (Ground Line)
- Overall Width: 48 inches (4 feet)
- Overall Depth: 24 inches (2 feet)
- Countertop Height: 36 inches (ergonomic standing height)
- Total Backrest Height: 56 inches
Materials & Lumber Cut List
Use our Raised Bed Lumber Calculator to optimize your lumber purchase and minimize cut scrap:
Lumber List (Western Red Cedar or Exterior Douglas Fir)
- Rear Legs (2): 2x4 @ 56 inches
- Front Legs (2): 2x4 @ 35-1/4 inches
- Worktop Apron Frames (4): 2x4 @ 45 inches (front/back) & 21 inches (sides)
- Lower Shelf Frames (4): 2x4 @ 45 inches (front/back) & 21 inches (sides)
- Countertop Boards (4): 2x6 @ 48 inches
- Lower Slatted Shelf (7): 1x4 @ 45 inches
- Upper Tool Shelf (1): 1x6 @ 48 inches
Fasteners & Hardware
- 2-1/2 inch #8 exterior-grade coated star-drive deck screws (for 2x4 and 2x6 frame joints)
- 1-5/8 inch exterior trim screws (for 1x4 lower shelf slats)
- Stainless steel catering hotel pan (12" x 20" x 6" deep) or plastic utility basin
- Waterproof wood glue (Titebond III)
Step-by-Step Construction Guide
Step 1: Assemble the Side Leg Ladders
Lay one rear 56-inch leg and one front 35-1/4-inch leg flat on your workbench, spaced 21 inches apart:
- Mark the countertop apron position at 33-3/4 inches from the bottom (accounting for the 1-1/2" thick top boards to reach 35-1/4").
- Mark the lower shelf support at 10 inches above the bottom of the legs.
- Fasten the 21-inch 2x4 side stretchers between the legs using waterproof wood glue and two 2-1/2-inch exterior deck screws driven through pre-drilled pilot holes.
- Repeat for the second side ladder.
       [Rear Leg: 56"]                               [Front Leg: 35-1/4"]
             ||                                              ||
             ||                                              ||
             ||========== [Upper 21" 2x4 Apron] =============||  (33-3/4" Mark)
             ||                                              ||
             ||                                              ||
             ||========== [Lower 21" 2x4 Stretcher] =========||  (10" Mark)
             ||                                              ||
Step 2: Join the Frame Front and Back
Stand the two side ladders upright and connect them with the 45-inch front and back 2x4 aprons:
- Secure one 45-inch apron flush with the top of the front legs and across the rear legs.
- Secure the lower 45-inch aprons across the bottom stretchers.
- Check for Square: Measure diagonally from corner to corner; adjust until both diagonal measurements match within 1/16 inch.
Step 3: Install the Lower Slatted Shelf
Place the seven 45-inch 1x4 cedar boards across the lower stretchers:
- Space them evenly with an approximate 1/4-inch gap between each board.
- Drive two 1-5/8-inch exterior trim screws through each end into the stretchers.
- This creates an airy, strong shelf capable of storing heavy bags of soil calculated with our Potting Soil Calculator.
Step 4: Fit the Countertop & Sink Basin
- Arrange the four 2x6x48-inch cedar boards across the top frame, leaving 1/8-inch gaps between boards for drainage.
- Fasten the boards to the perimeter aprons using countersunk 2-1/2-inch exterior deck screws.
- Position your drop-in metal basin on the right or left side of the worktop. Trace around the basin rim with a pencil, subtract 1/2 inch all around for the lip ledge, and cut the opening out using a jigsaw.
- Drop the basin in flush. You can sweep leftover soil straight into the pan for reuse.
  +-------------------------------------+------------------+
  |                                     |                  |
  |                                     |   [Recessed      |
  |        Slatted Cedar Worktop        |     Metal Basin  |
  |        (1/8" Drainage Gaps)         |     Dry Sink]    |
  |                                     |                  |
  +-------------------------------------+------------------+
Step 5: Add Upper Storage and Finishing
- Mount the 1x6x48-inch top shelf across the upper ends of the rear 56-inch uprights to hold seed packets, plant labels, and small hand tools.
- Screw brass cup hooks into the rear 2x4 uprights to hang trowels, hand rakes, and bypass pruners.
- Apply a breathable exterior penetrating oil (such as pure Tung oil or exterior UV-resistant deck sealer) to preserve cedar's rich golden-brown hue, or leave it unfinished to weather into a handsome silver-gray patina.
Placement & Foundation
Set your potting bench on a level, free-draining surface like a paver patio or crushed gravel bed. If placing directly on garden dirt, place flat concrete pavers under each 2x4 leg foot to prevent ground moisture wicking into the end grain.
Sources: Garden Workstations — Virginia Cooperative Extension, Wood Durability Guidelines — USDA Forest Products Laboratory.
FAQ
What is the ideal ergonomic height for a garden potting bench?
The standard ergonomic countertop height for a standing potting bench is 36 inches (identical to a standard kitchen counter). If you are taller than 6 feet, bumping the work surface height to 38 or 39 inches prevents lower back strain during long repotting sessions.
What is the best wood for an outdoor potting bench?
Western Red Cedar is the premier choice due to its natural thujaplicin oils, which resist rot, moisture warping, and insect damage without synthetic chemicals. Exterior-grade construction Redwood or Douglas fir treated with exterior penetrating oil are durable alternatives. Standard untreated pine will rot within 2 to 3 years outdoors.
How do you install a dry sink basin in a potting bench?
Cut a rectangular or round opening into the 2x6 countertop boards using a jigsaw, then drop in an inexpensive stainless steel catering hotel pan, plastic utility tub, or vintage washbasin. Drilling a small 1/2-inch hole in the bottom connected to a flexible PVC drain hose lets runoff drain directly into a garden watering bucket.
Should the potting bench worktop be solid or slatted?
A slatted worktop with 1/8-inch to 1/4-inch gaps between boards is ideal for outdoor potting benches. Slats allow spilled potting soil, sand, and irrigation water to fall through naturally rather than forming a soggy, muddy slurry on the counter.
How much lumber does this potting bench require?
You need six 2x4x8' cedar boards for the leg posts and structural framing, four 2x6x8' cedar boards for the main work surface and side aprons, and five 1x4x8' cedar boards for the slatted lower shelf and upper spice/tool rack.