How to Build a DIY Compost Sifter for Wheelbarrows

By Efraín Vega · Published November 13, 2026
Every passionate composter knows the feeling: you open your backyard compost bin, dig into the center, and find rich, crumbly, dark black organic matter—mixed with annoying chunks of half-rotted avocado pits, woody branches, pine bark mulch, and random garden stones.
Using unsifted compost in seed-starting flats or container pots stunts delicate seedlings.
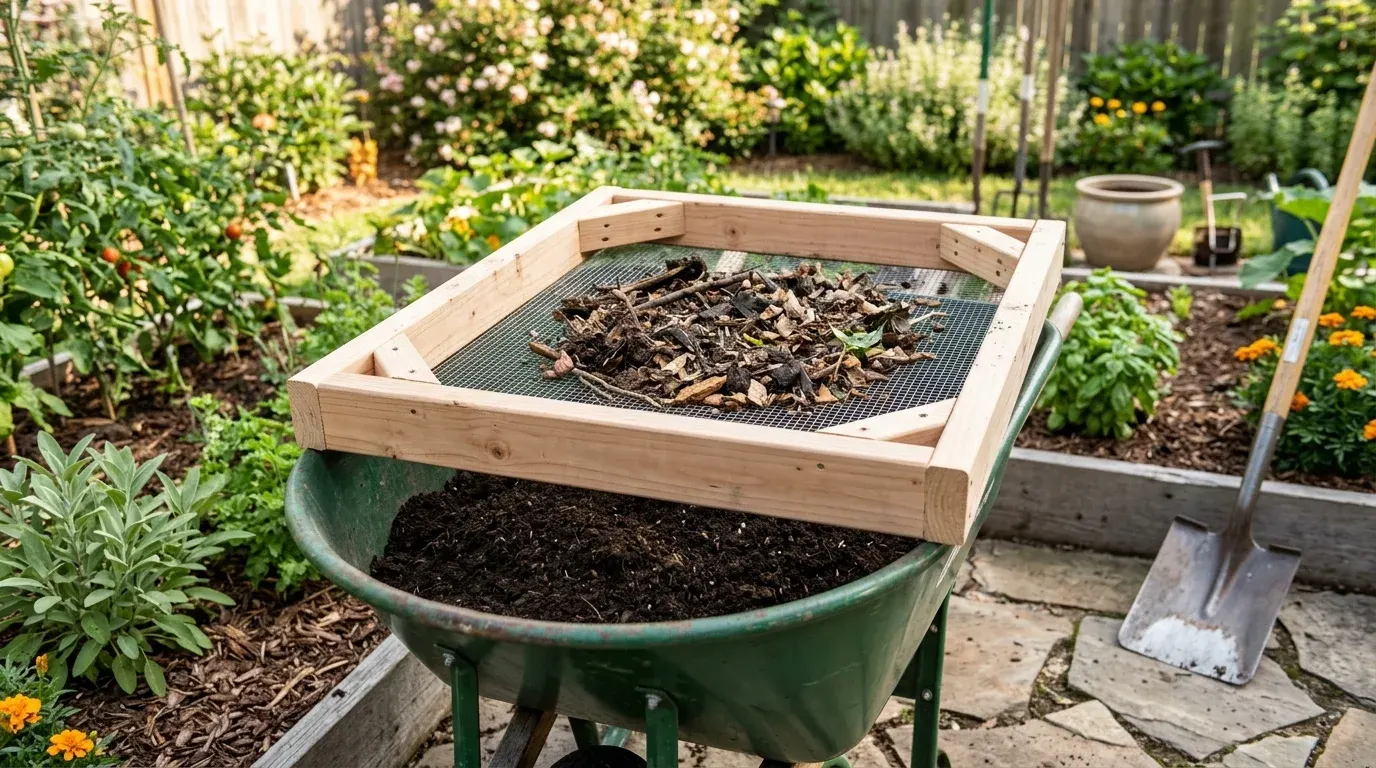
A custom wheelbarrow compost sifter turns a messy chore into a satisfying, rapid process. By sizing the wooden frame to fit the rim of your specific wheelbarrow tub and securing the hardware cloth with structural sandwich battens, you can process an entire 6-cubic-foot wheelbarrow of silky-smooth garden soil in less than five minutes.
Mesh Selection: 1/4-Inch vs. 1/2-Inch
Choosing the correct wire mesh dictates how fast you can work and how fine your finished soil will be:
| Mesh Size | Finished Texture | Ideal Use Case | Speed / Effort |
|---|---|---|---|
| 1/4-inch (0.25") | Fluffy, silky, uniform crumb | Seed starting flats, potting soil blends, lawn topdressing | Slower; requires back-and-forth hand agitating |
| 1/2-inch (0.50") | Coarse-medium aggregate | Bulk raised bed filling, orchard mulch, perennial bed prep | Very fast; soil falls through on first shake |
Build a Convertible Frame
Many gardeners build their frame with 1/2-inch mesh permanently attached to the base, and keep a secondary loose 1/4-inch drop-in insert frame for when they need seed-grade compost.
Dimensions & Anatomy of a Wheelbarrow Sifter
Most standard homeowner wheelbarrows have top tub dimensions between 26 and 30 inches wide and 32 to 36 inches long.
  +===================================================================+
  |  [Extended Handle: 4"]    [2x4 Pine/Cedar Perimeter]              |
  |  ||=============================================================|||
  |  ||                                                             |||
  |  ||                                                             |||
  |  ||         1/4" Galvanized Welded Hardware Cloth               |||
  |  ||         (Sandwiched under 1x2 wooden retention battens)     |||
  |  ||                                                             |||
  |  ||                                                             |||
  |  ||=============================================================|||
  |                             [Under-Tub Locking Cleats]            |
  +===================================================================+
- Outer Frame Dimensions: 28 inches wide by 34 inches long (fits standard 6 cu ft steel and poly wheelbarrows).
- Extended Handles: Leave side 2x4s protruding 4 inches past the frame on both ends to create comfortable ergonomic lifting and shaking grips.
- Underside Stop Cleats: Two 12-inch long 1x2 cleats mounted underneath lock against the inner walls of the tub.
Materials & Cut List
Use our Raised Bed Lumber Calculator to estimate board lengths and minimize cut waste:
Lumber
- Frame Sides (2): 2x4 @ 38 inches (includes 2-inch handle extensions on each end)
- Frame Ends (2): 2x4 @ 25 inches
- Mesh Sandwich Battens (2): 1x2 @ 34 inches & (2) 1x2 @ 25 inches
- Underside Tub Cleats (2): 1x2 @ 14 inches
Hardware
- Hardware Cloth: 36" x 10' roll of 1/4-inch hot-dipped galvanized welded wire
- Framing Screws: 3-inch #8 exterior star-drive deck screws (8)
- Batten Screws: 1-1/4 inch exterior wood screws (16)
- Heavy-Duty Staples: 3/8-inch or 1/2-inch T50 galvanized staples
Step-by-Step Build Instructions
Step 1: Cut and Assemble the 2x4 Box
- Cut your 2x4 boards to length using a miter saw or circular saw.
- Mark 2 inches in from each end of the 38-inch side boards to establish your corner joints, leaving 2 inches extending outward as handles.
- Pre-drill two 1/8-inch pilot holes through the side rails into the end boards.
- Drive 3-inch exterior deck screws with wood glue at each butt joint. Measure diagonally across the frame corners to verify the frame is square.
Step 2: Cut and Staple the Wire Mesh
- Roll out your galvanized hardware cloth across the frame. Cut it to size using heavy-duty tin snips or wire cutters (wear thick leather work gloves to prevent puncture scratches).
- Begin stapling along one long edge, driving a heavy-duty T50 staple every 2 inches.
- Pull the wire mesh tightly across the frame using pliers to eliminate any center sagging, and staple the opposite side. Staple the remaining two ends.
Step 3: Install the Wooden Sandwich Battens
Staples alone will tear loose over time when heavy shovel loads of wet compost hit the screen:
- Place your 1x2 wood strips directly over the stapled wire perimeter.
- Fasten the 1x2 battens down with 1-1/4-inch screws driven every 6 inches into the 2x4s.
- This creates a rock-solid mechanical wood-wire-wood sandwich that encapsulates all sharp cut wire ends and distributes shovel weight evenly.
       [Top 1x2 Batten]   ====> (Clamps wire flat & conceals sharp ends)
    -----------------------
    =======================  <==== 1/4" Galvanized Hardware Cloth
    -----------------------
       [Main 2x4 Frame]   ====> (Rigid structural perimeter)
Step 4: Position the Anti-Slip Wheelbarrow Cleats
- Set the assembled sifter on top of your wheelbarrow tub in your preferred operating position.
- Climb underneath or reach beneath the frame and mark where the inner rolled lip of the wheelbarrow tub meets the bottom of the sifter.
- Screw two 1x2 wooden cleat blocks into the bottom of the frame right against those pencil marks. Now, when you vigorously shake shovel loads, the cleats lock against the tub, preventing accidental spills.
Efficient Sifting Technique
- Let Compost Cure: Never sift soaking wet, muddy compost fresh after a heavy rain; wet compost clogs the wire mesh within seconds. Let compost dry for 2 to 3 days until crumbly.
- One Shovel Load at a Time: Place one to two flat spade loads onto the screen. Do not overload.
- The Quick Shake: Grab the extended handles and slide the sifter back and forth 3 to 4 times. Silky, black sifted soil drops immediately into the wheelbarrow tub below.
- Dump the Coarse Oversize: Tilt the sifter forward and dump the remaining woody twigs, stones, and unrotted mulch back into your active compost pile to act as biological innoculants for the next batch.
Sources: Compost Sifting & Soil Prep — University of Georgia Extension, Compost Quality in Home Gardens — Colorado State University Extension.
FAQ
What mesh size is best for a garden compost sifter?
A 1/4-inch (6 mm) galvanized welded wire hardware cloth is the universal standard for vegetable gardeners. It produces ultra-fine, fluffy 'black gold' suitable for seed starting trays, potting containers, and lawn topdressing. If you are screening bulk compost solely to fill deep raised beds, a 1/2-inch (12 mm) mesh works twice as fast with less shaking.
Can I use chicken wire instead of hardware cloth?
No. Hexagonal poultry netting (chicken wire) is made of thin, flexible wire with twisted joints that stretch, sag, and tear under the weight of damp shovel loads. Furthermore, its irregular 1-inch openings allow sharp sticks, rocks, and undigested root balls to slip through lengthwise.
How do you prevent the sifter from sliding off the wheelbarrow while shaking?
The secret is installing underside locking cleats. Fasten two 1x2-inch or 2x2-inch wood blocks to the bottom of the outer frame, spaced just inside the rim of your wheelbarrow tub. These cleats physically block the frame from sliding forward, backward, or sideways no matter how vigorously you shake the shovel loads.
Should I build a flat screen sifter or a rotating trommel sifter?
For 90% of home gardeners producing 1 to 5 cubic yards of compost annually, a flat wheelbarrow screen is superior. It costs under $25, builds in 45 minutes, has zero moving parts to break, and hangs flat against a shed wall on a single nail. Rotating barrel trommels are only worth the expense and storage footprint for commercial market gardeners.
How do you clean and prevent hardware cloth from rusting?
Always buy hot-dipped galvanized hardware cloth rather than bare electro-galvanized wire. After sifting, tap the frame upside-down against a wooden block to dislodge trapped twigs, and store the sifter upright in a dry garage or shed. Avoid leaving it face-up in the rain, which can pit the wire over time.