Drip Irrigation Layout & Emitter Spacing Guide

By Efraín Vega · Published November 11, 2026
A properly planned drip irrigation system cuts backyard garden water consumption by 30% to 50%, reduces weed growth by leaving surface mulch dry, and prevents foliar fungal diseases like tomato blight by delivering water straight to root zones.
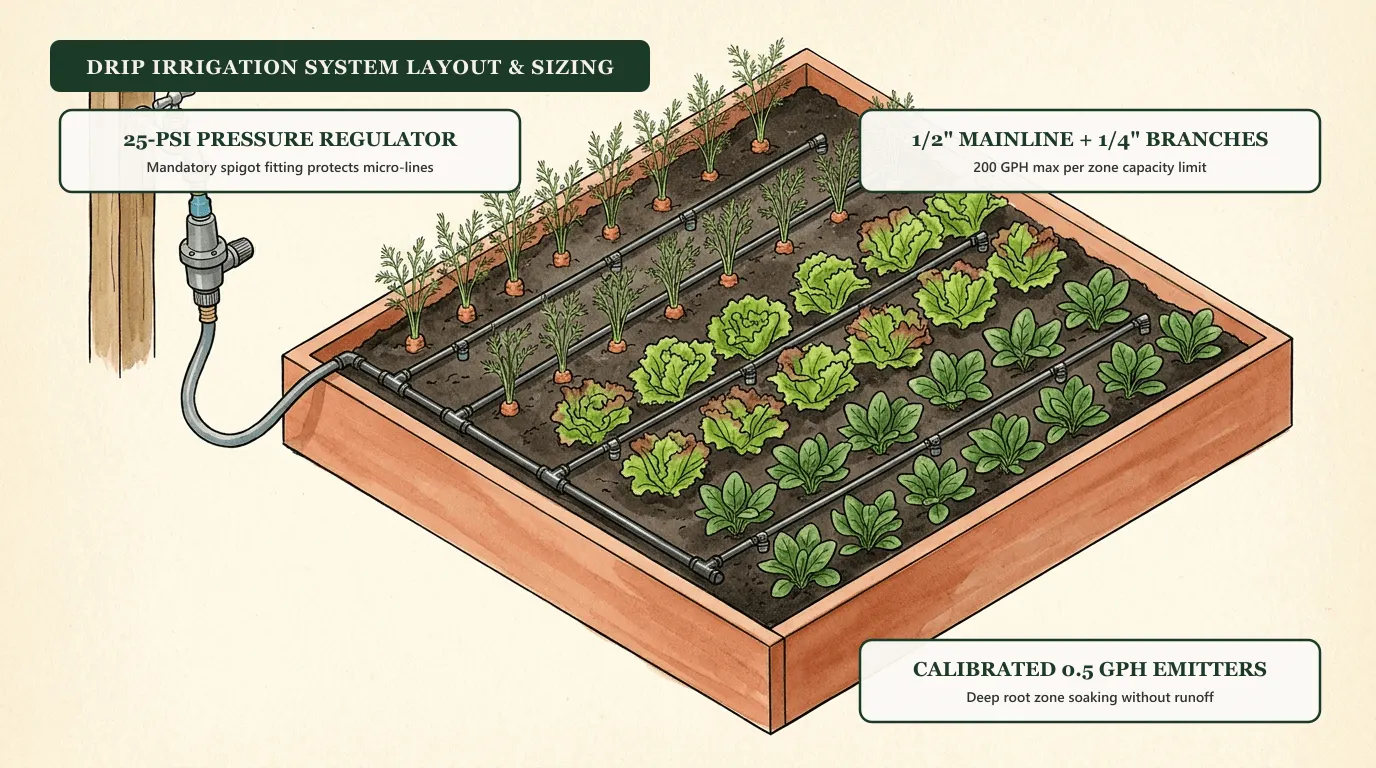
The key to a reliable DIY setup is balancing line pressure (25 PSI), total flow rate (under 200 GPH per zone), and soil infiltration speed.
Core components of a drip system manifold
Every hose-bib-connected drip system requires five basic fittings arranged in order at the outdoor spigot:
- Hose Timer / Controller: Programmable battery-operated timer for automated early-morning watering (5:00 AM to 7:00 AM).
- Backflow Preventer (Vacuum Breaker): Mandatory code fitting that prevents garden water from siphoning back into household drinking lines.
- 25-PSI Pressure Regulator: Household pressure (50–80 PSI) easily blows fittings apart. A 25-PSI regulator steps line pressure down to safe drip operating thresholds.
- 150-Mesh Filter: Traps sediment, rust, and algae before they reach micro-emitters.
- 1/2-Inch Poly Tubing Adapter: Converts hose threads into compression or lock fittings for the black mainline pipe.
Choosing the right tubing layout for your garden
| Garden Setup | Recommended System | Tubing Diameter | Flow Rate per Point |
|---|---|---|---|
| Raised Garden Beds (Vegetables) | Inline 1/2" emitter tubing grid or 1/4" micro-branches | 1/2" header + 1/4" lines | 0.5 GPH to 1.0 GPH |
| Close Row Crops (Carrots, Onions) | 1/2" tubing with pre-punched emitters (6" or 12" spacing) | 1/2" inline tubing | 0.5 GPH |
| Large Spaced Plants (Tomatoes, Squash) | 1/2" solid blank line with punched button drippers on stakes | 1/2" solid + 1/4" leads | 1.0 GPH (2 drippers per plant) |
| Container Pots & Hanging Baskets | 1/4" micro-tubing runs off 1/2" header with end bubblers | 1/4" vinyl micro-tubing | 0.5 to 2.0 GPH adjustable |
Use our Drip Irrigation Calculator to determine total line length, emitter counts, tees, elbow fittings, and water gallon demand for your specific bed dimensions.
Emitter flow rates & run times by soil type
Water spreads differently depending on the soil texture in your beds:
- Sandy Soil: Water moves almost straight downward with minimal horizontal spread (10–12 inch cone). Use 0.5 GPH to 1.0 GPH emitters spaced 6 to 9 inches apart. Run water for 20 to 30 minutes, 3 to 4 times per week.
- Loam / Raised Bed Mix: Ideal wicking properties (16–18 inch moisture bulb). Use 0.5 GPH emitters spaced 12 inches apart. Run water for 30 to 45 minutes, 2 to 3 times per week.
- Clay Soil: Water spreads sideways readily (up to 24 inches) but absorbs slowly. Use 0.5 GPH emitters spaced 12 to 18 inches apart to avoid surface pooling.
200 GPH capacity rule for 1/2-inch mainline
Before cutting tubing, ensure your layout doesn't exceed the capacity of your 1/2-inch polyethylene mainline:
- Max Flow per Zone: A 1/2-inch mainline pipe maxes out at 200 to 220 GPH. To check: multiply your total emitters by their GPH rating (e.g., 150 emitters at 1.0 GPH = 150 GPH, safely within limit).
- Max Length: Keep a single continuous 1/2-inch run under 200 to 250 feet.
- 1/4-inch Micro-tubing Limit: Never exceed 30 feet of 1/4-inch tubing on a single branch (or more than 30 GPH total on that branch), or emitters near the end will barely drip.
Winterizing drip lines
In frost regions (Zones 3–7), drain the spigot manifold assembly, remove the regulator and timer to an indoor garage, and open the tubing end caps to drain standing water before freezing weather sets in. Follow our complete guide to winterizing drip irrigation lines.
Sources: University of California Agriculture & Natural Resources (UC ANR) Publication 8003, Drip Irrigation in the Home Landscape; Irrigation Association (IA) Residential Drip Guidelines.
FAQ
What size drip irrigation tubing should I use?
Use 1/2-inch (0.600 to 0.700 in OD) polyethylene tubing as the primary mainline manifold header from your water source. From this header, branch off with 1/4-inch micro-tubing or 1/2-inch inline emitter tubing directly to garden rows.
How far apart should drip emitters be spaced?
Space emitters 6 to 12 inches apart for closely planted greens, root vegetables, and herbs in sandy/loam soil. In dense clay soil where water wicks horizontally, space emitters 12 to 18 inches apart. Place 2 to 3 drippers around large plants like tomatoes and squash.
What emitter flow rate (GPH) is best for vegetables?
0.5 GPH (gallons per hour) or 1.0 GPH pressure-compensating button emitters are ideal for raised beds. A 0.5 GPH dripper provides deep, slow root infiltration without surface ponding or runoff.
How much drip line can you put on one zone?
A standard 1/2-inch poly line can carry up to 200 to 220 gallons per hour (GPH) or roughly 200 to 250 feet of line before experiencing friction loss and pressure drop. Keep individual 1/4-inch micro-tubing runs under 30 feet.
Do you need a pressure regulator for drip irrigation?
Yes. Residential municipal household water pressure is typically 40 to 70 PSI, which will blow off drip micro-fittings. Install a 25 PSI pressure regulator and a vacuum breaker / backflow preventer at the outdoor spigot.